Search This Blog

Thursday, March 14, 2019

What do you call this garment? (or, How I Learned to Stop Worrying and Just Make the Damn Thing)

So, this is the first construction-focused post on the outfit I am making for Ostgardr's Day of the Decameron.  A run-down of my shallow dive into 14th century Iberian fashion can be found here.

I already have a suitable shirt for this era, so my first step in making this outfit was to work on the "foundation" garment.  Since I was looking at a short style, I intend to wear joined hose.  Joined hose need to be held up by something.  With overgarments as short as what I'm planning, the earlier medieval fashion of just tying individual hose for each leg to a belt or the waistband of the braes isn't suitable.  There was a transitional style of "split hose" where the hose were tall enough to cover the buttocks/pelvis, but each leg was still a separate item.  But, in the interest of not inadvertently flashing my underwear at people (even if I can throw together some period braes), I'm going with joined hose.  So, that means a torso garment to hold up the hose.

There's a great discussion of braes and hosen on this message board.  I highly encourage anyone interested in this era to check it out.  Robert MacPherson, especially seems to have collected a truly impressive number of pictures of men in their underwear - and I'm grateful!  Some of these images are a bit later than my 1390s target.

What the right name for this garment is seems to be a bit of a puzzle.  Possibilities include "doublet", "pourpoint", and "jupon".

Some reenactors prefer to call this a doublet.  I don't like that primarily because it's a term that is used (correctly) for later, more structured, garments from the 15th century proper through the 17th century.  Those garments seem to generally have more internal structure than what I'm going for here.  I'm not trying to shape the body, build a silhouette, or even stiffen the garment itself.  I personally like the term pourpoint.  It comes from French, literally meaning the thing that you tie your points (laces or ties) to.  But this term may also refer to the same type of garment as 'jupon'.  The term jupon derives from a military garment - something with attachment points for armor.  But, many military styles worked their way into the civilian world, inlcuding the jupon - as we saw in my previous post.  But this item is something for under a more stylish garment merely to hold up the hose.  The jupon seems to be a garment that may be worn on its own.  I am definitely not going to settle the debate about what this garment should be called.  So, I'm just calling mine The Blue Thing.

In the end, I will probably not actually use the Blue Thing for my Decameron outfit.  I started making this before I had totally settled on what I wanted the final outfit to look like (rookie mistake - I should know better by now!).  More on that in subsequent posts.  But it was a good test garment that allowed me to get a reality check on fit and will be a suitable foundation garment for more properly 15th century styles, if I ever decide to make them.

My main sources for construction details were Crowfoot, Pritchard, and Staniland's Textiles and Clothing, 1150-1450 from the Museum of London series and Sarah Thursfield's The Medieval Tailor's Assistant.  I used modern drafting methods to make a basic block for the body.  It's meant to simply be a thin, close-fitting layer over the shirt.  So, after checking the fit, all I did to turn my basic block into a final pattern was extend it from the natural waist down to the level of my hipbones and add seam allowances.  I use 1/2" as my default in most places.  The neck was only 1/4".  I added a 1" turn back at the center front and the hem.

The sleeve pattern was started from Thursfield's draft, which I love for creating the proper sleeve cap shape for these later medieval garments.  Her draft is for a one piece sleeve with the seam running down the back of the arm.  There's a lot of evidence for a triangular gore at the top of the sleeve seam in the 14th century.  This is found on all the garments from Herjolfsnes, Greenland with surviving sleeves, and can be seen in artwork of the era from mainland Europe.  I'm not sure if this construction method would be outdated for my Blue Thing.  But I've never tried it before, so I wanted to give it a go.


After drafting the sleeve to Thursfield's instructions, I marked out the under-sleeve half of the seam from the armscye to the elbow (on the right in my photo).  Making sure I had enough width for my elbow and biceps, I then drew a parallel line to this one to represent the over-sleeve side of the seam.  They don't look quite parallel in the photo, but they are.  The sleeve then tapers evenly on both sides from elbow to wrist (cut off at the bottom of the photo).  The portion of the sleeve cap between the new line and the back edge becomes the base of the triangular gore.  I just drew a straight line from the back point of the sleeve cap to meet my new seam about halfway to the elbow.  As you can see from the photo, this has the effect of eliminating width in the sleeve for the upper arm.  So this is a useful technique to create a really slim-fitting sleeve.


I actually made a mistake here, which I didn't realize until after I had cut my fabric.  The two sides of my gore are not equal.  This is a problem because it's being set into a seam whose sides are equal before the gore is set into it.  In the end, I had to ease the over-sleeve side of the seam into the under-sleeve side for a bit above the elbow.  This is not necessarily a bad thing from a sleeve-fitting perspective, but it should not have been necessary if I had made the pattern right.  A good reminder to always walk your patterns before adding seam allowance to make sure that the seams match up.  What I SHOULD have done was trace off the curve from the left side of the sleeve top (which is the base of the gore), connect the two ends of the curve with a straight line and then draw a perpendicular bisecting line to that to be the center line of the gore.  Then, the two sides of the gore would form an isoceles triangle with the curve as the base.  I don't think that the fit would change much, but it would definitely have gone together much more easily.

The fabric I used is a worsted wool twill in a light blue.  I'm always thrilled to find wool suiting that isn't in a shade of gray, or pinstripe, or some other pattern that just screams modern menswear.  I ended up paying more than I wanted to for this, but I did haggle the store down quite a bit and I only needed 2 yards (in fact, I needed even less than that, but I hadn't made the pattern pieces when I bought it and wasn't sure just how efficient I could get with it).  The wool is backed by a medium weight linen for body and I stitched a strip of stiff linen canvas to the center front edge for reinforcement to avoid pulling.  I used some light weight linen I had lying around for a lining.  There's an interesting debate to be had as to whether linen is an appropriate lining material for this type of garment in this era.  But, for this project thrift carried the day.

The construction is a mix of more medieval methods and later tailoring techniques such as those described by the Modern Maker in Renaissance clothing.  I did cheat and use my sewing machine for the main construction seams in order to save time.  But all the finishing was done by hand.  As an example of earlier construction techniques, the neck edge and the sleeve cuffs were finised by cutting the lining short and making a double-fold hem over it, which is stitched down with short running stitches.  This is really a more primitive construction method.  But, because I am a bit of a perfectionist, I did proper buttonholes and bar tacks, as seen on later clothing.  I suspect that the use of a bar tack at the top of the sleeve vent might be especially anachronistic for late 14th or early 15th century, but especially given the sleeve seam issues I had, I wanted the extra reinforcement.

The buttons are made as described in Crowfoot, et al.  I stitched a circle in running stitch on a small square of fabric, then pulled that thread up like a drawstring, tucking all the raw edges inside.  With a few stitches across the bottom once it's gathered, the whole thing pulls up into a ball shape.  I started with a 1.5 inch square, made a 1 inch circle with my running stitches, and the finished buttons are about 3/8" (1cm) across.  This is in the range of the ones reported from London by Crowfoot, et al.

There's an important detail in Crowfoot, et al. about the way the cloth buttons they excavated were made that many re-enactors overlook when making cloth buttons for clothing of this era.  Their diagrams and pictures clearly show that these buttons are not just little spheres of cloth.  There are stitches through the entire thing from front to back, forming concentric circles of dimples on the surface.  I only have one stitch in the center and then a ring of 6 stitches around it.  But, even this small amount of stitching does two things: it flattens the button just a bit and it stiffens the button the way that quilting or padstitching do for flat pieces.  Having a button that's just a bit flattened (kind of like a jelly doughnut or sandwich roll) is a lot easier to put through the buttonhole - especially with one hand.  And the extra stiffness also makes it easier to push through.  Squishy buttons don't work well.  The photo on the left shows the buttons unfastened and you can more clearly see the thread shank formed from attaching the button.  This is also important, since if the button sits flush with the fabric, there's no accommodation for the thickness of the buttonhole.  Again, I need to do everything I can to make these buttons easy to fasten with one hand.

I chose to have this garment lace up the front.  Since it is essentially something that is meant to have another layer worn over it, this provides a nice, smooth front surface for whatever I put on top.  If/when I get around to making a proper 15th century outfit, I'll have to put some eyelet holes around the hem for tying up my hosen.  As it turns out, this is really closer to a 15th century type of doublt that what I had planned.  And, my ultimate decision on my Decameron outfit went in a different direction.  So, for now, I'm putting the Blue Thing aside.

Apologies for the less than inspiring background - my only full length mirror at the moment is in the bathroom. 


Friday, March 08, 2019

Indulging my Gothic tendencies

Our local SCA group is having an event centering on the Decameron, an Italian collection of stories from the mid-14th century.  Since our lovely hosts were so enthusiastic about it, I decided to hop on the bandwagon of people dressing for the occasion in proper 14th century style.  Technically, the Moorish clothing that I wear most frequently for SCA events is based on 14th century examples.  But, for this day I figured I'd try out some of the Christian styles of the time.  The Decameron was first published around 1350, so I'm looking at the later half of the century for inspiration.  This is the story of how I started planning an outfit for the Day of the Decameron.

It's a bit of a ride, so buckle up!

I could have just made the standard "cotehardie" style clothing that is seen very commonly among the SCA and other reenactors.  But, since my interests generally slide back and forth along the Iberian timeline, I thought I would see if there was any way to give the style a more distinctively Iberian flair.  This is not as easy as you might think it should be.  The clothing of Spain and Portugal is rarely given more than a passing mention in books on the history of European clothing in general.  While the clothing of Christian people in Iberia is not disconnected from that of the rest of Western Europe, until the late 16th century (when the rest of Europe adopted Spanish fashions) things south of the Pyrenees were always just a bit different.  Sometimes quite a lot different!

Also, it seems like there's a paucity of artwork from 14th century Iberia - or at least artwork depicting people and their clothes.  As in the rest of Europe, much of the artwork from this era is religious in nature.  Saints are often depicted in flowing, draped fabrics, which is likely meant to evoke a sort of old-timey appearance to the viewer.  There's lots of evidence for clothing from the 13th century.  The Cantigas de Stanta Maria and the Book of Games of Alfonso X, El Sabio (both from the mid-13th century) provide dozens of images of men and women in quite a variety of dress.  There are even several surviving garments from royal burials in the 13th century.  And once we get into the 15th century proper, the blossoming of painting associated with the Renaissance provides much more variety of art.  Plus, a lot of secondary sources have focused on the later 15th century, since this is the age of the Catholic Monarchs, Ferdinand and Isabel.  However, in between those two eras, there's a bit of a gap.

So, what sources could I find from the second half of the 14th century in Iberia?

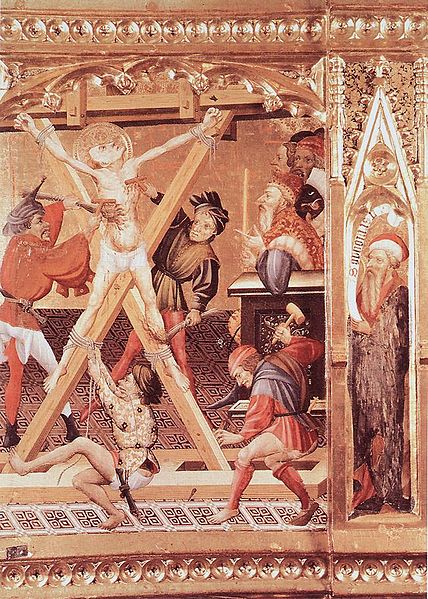
Moors and Christians in Granada

I revisited my main source for Moorish clothing of this era: 3 paintings on the ceiling of the Hall of Kings (Sala de los Reyes) in the Alhambra.  These were probably done in the late 14th century.  There are three sections of the ceiling, each depicting realistically rendered figures.  The central portion shows ten Muslim kings, or possibly judges or courtiers.  However, the two side sections show battle/jousting and hunting scenes, which include people dressed in both Christian and Muslim styles.  This hall was unfortunately closed for restoration when I visited in 2010.  But there are some great post-restoration images on Wikipedia.  Also, Milia Davenport's The Book of Costume includes plates of these.  Those of the two lateral sections appear to be line drawings taken from the painted ceilings.  My guess is that this was done in the 18th century, since there was a surge of interest in the Alhambra at that time.  However, since the condition of the paintings had clearly deteriorated a lot subsequently (as can be seen in this this photo) I suspect that drawings or copies from the 18th century were used by the conservationists to guide the restoration.

Interestingly, the Christian men shown in the lateral paintings of the Hall of Kings all have pretty typical "cotehardie" style clothing.  It's not substantially different from the styles seen in Anglo-French clothing of the mid to late 14th century.  This garment could, in fact, be a jupon, which is a point I'll get to later.

Hall of Kings (Alhambra) 17 (30432581978).jpg
Ceiling from the Hall of Kings at the Alhambra

As seen here, the men have tall hosen.  One figure is shown with his hosen rolled down to below his knees.  The more fancy looking guys have relatively short cotes, suggesting full split hosen or even joined hosen.  (Just when joined hosen came into use is a bit of a contentious subject which I am completely side-stepping here)  People who seem to be more closely involved in the manual labor of hunting (on the right hand side of this image) have less fitted clothing.  The cotes of the more fancy figures are fitted, buttoned down the front, and have long, fitted sleeves with buttons from elbow to wrist.  Most seem to have the extended cuff reaching down to the knuckles that is seen in contemporary art from other areas.

The one feature that I can't recall having seen in art elsewhere is that the cotes seem to have a slit at the bottom of the side seams.  Men's tunics/cotes from earlier in the Middle Ages sometimes have slits.  But, those are generally longer garments, usually coming to below the knees.  Cotes like these, that end at the level of the upper thigh or mid-thigh, don't always need to have a slit for functional purposes and, while they may have dagged hems, slits like this are unusual.

There are several figures wearing hoods, generally with short hems and some indication of a liripipe (the tail hanging off the back), and more than one has what look like buttons closing the center front under the chin.  The mounted figure in this painting (upside down at top right) seems to be wearing a waist-length or hip-length cape, closed by three buttons at the neck.

Granada Palacios Nazaries 5.jpg
Another section of the Hall of Kings ceiling
So, if I were to just use these images, I could probably justify styles that are more or less the same as those seen in other parts of Western Europe.  In the 1380s-90s we start to see some new developments in fashion.  In France, England, and Italy some more interesting sleeve shapes and tall collars show up toward the end of the century.  Sometimes these accompany the shift to a more flared body (which essentially is the earliest form of the houppelande).  But, there are plenty of examples with fitted bodies as well.

Transitional styles at the end of the 14th century

Looking for some of these transitional forms in Spanish or Portugese art was tough.  This retable in the Victoria & Albert Museum was painted around 1400.
File:Andrés Marzal De Sax - Retable of St George (detail) - WGA14172.jpg
Retable of St. George by Andres Marzal de Sas, c. 1400
The bag sleeves are a style I've wanted to try out for a while.  I'm particularly intrigued by the square bits hanging from the sleeve seam on the man at far right.  I can't think of another source where I've seen that decorative element.  But then it shows up in a different form in this retable from Tarazona, dated to the 1390s.

Detail from a retable, Tarazona Cathedral
Unfortunately, most of the rest of these two men's outfits is obscured by the toturer in front of them (the image is St. Lawrence on a grill).  They both have tall collars.  They both have red sleeves but a body garment of a different color.  The one in blue has the hint of maybe buttons on his left shoulder - making me think that this could be some sort of cloak or mantle.  I've never seen a cloak or mantle with a tall collar before, but like I said, things south of the Pyrenees are different.  I really can't tell what's going on with the man in black at all.  Both of these fellows, as well as St. George's torturers in the above picture seem to have the looser bodied garments that are new and fashion-forward for this decade.  I think I'd like to stick with the fitted cotehardie-style silhouette, but I'm really looking for some more exciting sleeves (and, to be honest, an excuse not to have to make a million buttonholes for those long, fitted sleeves).  I would love to do a fitted cote with tall collar and bag sleeves like the left-most one in this illumination (from a manuscript of 1395), but so far I'm having no luck finding this style in Iberia.

Adventures in translation, or How different is Catalunya?

This is where my whimsical research started going into rabbit-hole territory. Someone on Facebook made me aware of the existence of a book in Catalan: La Moda a la Catalunya del Segle XIV by Montse Aymerich Bassols.  It's available on Amazon.   Now, I don't speak Catalan.  I can read Spanish, but I'm not fully fluent.  So, with a lot of effort and the help of Google I CAN understand the Catalan writing.  But I really haven't had the time to go through all the text.  Luckily, Aymerich Bassol has included lots of pictures.

So, looking through this book there's a lot that's similar to comtemporary Anglo-French fashion.  There's some Iberian oddities to be sure (a musician wearing a parti-colored cote with one half being a green and white check pattern, for instance, or a birth attendant whose parti-color garment seems to have one half from plaid on the bias).  Aymerich Bassol breaks the ubiquitous cote (cota in Catalan) into three types, plus the cota ardia (seemingly a Catalan cognate to the English cotehardie).  I haven't made it through enough of the text to understand exactly what the distinctions are between her types A, B, and C.  The pictures included in those sections all seem to show tunics similar to the geometrically constructed ones found in the rest of western Europe throughout the Middle Ages (check out my post on geometric clothing for some examples).  There are some with buttons down the front, but they generally don't look fitted enough to need a front opening.  For the most part these images are from prior to 1350, so a bit early for what I'm aiming to replicate.

It's difficult to say without translating the whole text, but Aymerich Bassol seems to be using the term cota ardia to refer to an over-garment with short sleeves that have a hanging part in back.  She uses a word that I think means 'shovel' to describe the shape, which I think is apt.

 I THINK that she's using the term gonella to refer to the long sleeved garment under it, whose sleeves are usually buttoned from the elbow to wrist.  She also uses the term gonella to label the inner garments from the 13th century burials in Burgos.  In Spanish these early close-fitting garments are usually called sayo (or saya, for a woman's garment).  I can't even guess what the origin of the term gonella is.  Aymerich Bassol's cotas ardias are not universally close-fitting.  Even more surprising, none of pictures in this book of cotes with these shovel-shaped sleeves seem to show buttons down the front.  So, despite the obvious cognate, I'm forcing myself to dissociate Aymerich Bassol's cota ardia from what we in the SCA usually call a cotehardie.  The garments comparable to these cotas ardias in the Anglo-French tradition are usually just called cotes or over-tunics.

But, the other surprising thing (compared with fashions north of the Pyrenees) was the prevalance of a garment that Aymerich Bassols calls the gramalla.  This a a loose, flared garment with very characteristic decoration of two hanging flaps at the front of the neck.  This garment shows up in the Anglo-French setting as well.  Mary Houston calls it a 'sclavine' or 'esclavine' but I've seen some sources use the term 'garnache'.  It seems to be exclusively a protective outer garment in more northern countries and is a style more characteristic of the 13th century.  But, apparently these gramallas are all over Catalunya (and possibly the rest of Iberia?) including on pictures of kings.  The same garment shows up on the Moorish kings in the Alhambra ceilings - including with the funny little flaps at the front neck - and on the mounted Moor in the picture I included above.  They are long - pretty much between mid-calf length and ankle length.  They often have an attached hood, but not always.  This is such a ubiquitous garment that Aymerich Bassols calls it essential to 14th century style.  In the pictures, the gonella, cota, and the gramalla are often shown all being the same color - possibly indicating that they were made as, and considered to be, a suit.  Most of the images she shows of the gramalla have the distinctive shovel-shaped sleeves of the cota ardia visible underneath, but she also has a brief section on titled "La gramalla, la gonella i la cota no ardia".  There are a few images of men wearing the gramalla with one or more long-sleeved garments under it that do not have the shovel-shaped pendant.

The other type of garment to consider is the one Aymerich Bassols calls a gipó.  This word is clearly related to the French jupon which seems to get used interchangeably with 'pourpoint' in a lot of writing about Anglo-French clothing of this era.  The Catalan gipó is much the same: a closely fitted, short garment, buttoned all the way down the front.  Aymerich Bassols specifically compares it to the surviving jupon or pourpoint of Charles de Blois.  Note, there are 2 surviving garments attributed to him.  She includes photos of this one which has a narrow skirt with slit side seams.  [edit: I can't seem to link directly to the item on the Musee de Tissus page; type "pourpoint" into the search and it will come up.] The other has a more flared skirt and less complex cutting for the sleeve but is very similar and there's a thorough analysis of its construction in this article.  The surviving garments from Charles de Blois are both quilted.  Likewise, most of the pictures that Aymerich Bassols identifies as gipós have lines or other markings that seem to suggest quilting (see the sculpture included to the left).  Not all the pictures she includes of gipós have close, buttoned sleeves, and some have a weird band of a different color at the waist (like the one below from Tarazona cathedral).  This is not a belt; at least one picture clearly shows a belt over it, so I'm a bit at a loss as to how to interpret itBut ultimately, this is probably the same type of garment shown on the hunting guys in the Alhambra ceiling.
Retable, Tarazona

Since I'm drawing so much on this Catalan book, I need to step back a minute and ask an important question.  How different is Catalunya from the rest of Iberia?  In the 14th century, Catalunya was already part of the Crown of Aragon.  But, the individual Christian kingdoms of Iberia hadn't yet subsumed their individual identities to the degree that would happen later.  In fact, even now Catalunya still holds onto a distinct cultural identity and its language.  So, how much can I generalize Catalan styles to the rest of Christian Iberia?  The only answer I can give for now is that the styles Aymerich Bassols shows aren't all that different from broader European trends at the time.  She includes some images from Castille and France.  And the characteristics that diverge from fashion elsewhere in western Europe do show up elsewhere in Iberia - the images I've included here are from Tarazona (Aragon), Xèrica (Valencia), and Granada.  So, while there may be a distinctively Catalan style of the later 14th century, most of the characteristics that distinguish it from fashion north of the Pyrenees are probably more broadly Iberian.

Conclusions

So, if I want to create an outfit that demonstrates a distinctly Iberian style from the second half of the 14th century, there seem to be two broad categories to choose from.  (1) The gipó in its various forms, and (2) an ensemble of gonella, cota (particularly the cota ardia), and gramalla.  Aymerich Bassols also has a chapter on a garment she calls the aljuba, which I'm ignoring for now because it's still very unclear to me what this garment is and how it differs from any other garments.

The gipó is very fitted, quite probably quilted to greater or lesser degree, with long, close sleeves buttoned from the elbow to wrist.  The length is often to just barely below the crotch, and there may be slits at the side seams, or a fuller hem.  This short style requires tall hosen - the type that come up to the waist or at least the hip-bones.  Whether they are all joined hose (the kind that are connected along the crotch with a codpiece in front) or the earlier split hose is a bit of an open question to me, and just when joined hose come into use is a topic that is up for debate.  Like elsewhere in western Europe, these close-fitting styles are worn with a belt that rides low on the hips.  The guys on the Alhambra ceiling have characteristic 14th century hoods with liripipes (the long, narrow tail hanging from the point of the hood).  Some of the gipó-wearing men in the pictures from Aymerich Bassols' book have other sorts of soft hats and some are bare-headed.

Men wearing the cota ardia generally have a garment with long, buttoned sleeves under it.  However, the only pictures that Aymerich Bassols shows of men wearing a garment with long, buttoned sleeves without something over it are the gipós.  I'll have to translate more of her text about the gonella to see if she has any indication of the shape of the body of this garment.  It could be similar to the 13th century gonella/sayo which has a distinctive cut-in, square armhole and tight fit.  Or, toward the end of the 14th century, there could be a variation on the gipó under the cota.

The cotas, whether ardia or no, range in length from  just above the knee to mid-calf.  I think that the shovel-shaped cota ardia sleeve would be more distinctive to the second half of the century.  Given the length of the cotas, they could be worn with the earlier style of separate hose or the later split hose.  Again, without any more distinctively Iberian evidence I would have to go by practices in the rest of western Europe at the time.  The addition of a gramalla, especially in a fabric that matches the cota and/or the gonella would be more characteristically Iberian.  Of note is that a belt is never shown over the gramalla.  The two men in the picture I included above have swords hanging from long belts over their shoulder, but the gramalla does not get held in by a belt at the waist.  When we see the cota without something over it, it could be belted or not.

The typical 14th-century liripipe hood is in evidence on men wearing the cota.  The gramalla sometimes has an attached hood.  There are also plenty of pictures of men with or without the gramalla wearing a hood as a hat (with the face opening rolled up into the brim - a style well-documented elsewhere in Europe at this time).  Some men are bare-headed and some seem to be wearing simple coifs.  There's a few other hat styles in Aymerich Bassols as well.

So, what will I do to join in for our Decameron event?  I have to decide how many layers/items I'm willing to make.  And how "cutting edge" I want to be.  Details, and a construction diary of sorts, will follow once I've put the outfit together.


Wednesday, February 27, 2019

Itsy-bitsy teeny-weeny sock

Here's my latest adventure in nalbinding. 

I decided to try and replicate this red and yellow sock in pierced looping from the V&A (item # 1287-1904). The idea here was to give myself another "reality check" on gauge. I am happy to say that I have finally gone overboard on doing tiny gauge work! I got some cones of weaving yarn (this one for the curious). When I measured, I got 22 wraps/in, which is what it's advertised as. 

I chose this sock because the museum has very good photos from multiple angles, making it possible to attempt to count stiches and rows.  Based on the V&A's photos, I counted rows and stitches as best I could. This stitch is pretty easy to count, though, in part because it is one of only 2 nalbinding stitches I know that lines up into vertical columns (the other being the typical Coptic stitch). Then, I tried to make a sock with the same number of rows and stitches. 

The V&A's sock is listed as being 12.5cm long, 6.7cm wide, and 4.5cm high. I'm not sure what 'height' means here, so I'm sticking with the other two. Based on counting rows and stitches in the museum's photos, I estimated this sock should be 4.77 st/cm or 12 st/in. I pretty much hit that mark with the weaving yarn. 

My sock, top view - I have stuffed it with a bit of brown paper to mimic the stuffing in the pictures of the V&A sock.

Top view of the V&A's sock

However, my sock is only 12.0cm long (from tip of toe to tip of heel) and 5.3cm wide (flattened out completely, across the instep). As you can see in the photos, it's narrower in relaton to its length than the V&A sock.  So, I may have undercounted the number of stitches around. But, I don't think I've made any error on the number of rows visible on the sole. Which means that I've probably found yarn that's (probably) too thin compared to the archaeological samples. This is useful.  

The sole of my sock

The sole of the V&A's sock

As you can see in the photo below, without something inside the sock, it curls up very tightly in an S-twisted direction. The stitches themselves are Z-twisted (F2 -/O in Hansen notation). I did counteract the twist in the yarn as I was working, but I doubt I balanced perfectly.  Those of you with sharp eyes may notice that the V&A's sock has S-twisted stitches, but I find it easier to work this way.  Regardless, the nature of the stitch leads to twisting, as with all nalbinding.  Since the museum has not posted a photo of their sock unstuffed, I can't compare.  This is unfortunate, since seeing the degree of twisting might have given me some idea about relative tension.  


The other really interesting thing here is that the waffle-like texture is MUCH less noticable at this gauge than in my sample with worsted weight wool. This has a pretty smooth texture in the finished product, though not as smooth as standard Coptic stitch. I would totally consider making a pair of socks in this stitch instead of regular Coptic when I get around to making another full size pair.


So, what did I learn from this little experiment?  I already knew that the gauge on surviving socks in Coptic stitch ranges approximately from 8-12 stitches per inch.  My previous efforts, using fingering/sock weight yarn (which was 16 wraps/inch) got me about 8.5 stitches/inch.  With this yarn (22 wraps/inch) my end result is about 12 stitches/inch.  So, this suggests that the yarns in the surviving socks are generally in the range of 16-22 wraps/inch (maybe as thick as 14, since the 16 wpi yarn gave me something slightly finer than the coarsest of the museum socks).  This is useful information, since yarn thickness is not generally a piece of information that museums report (many don't even report gauge and my figures are based in large part on estimating from reported measurements and photos).  It would be interesting to compare this to information on yarn size in contemporary woven textiles - but that will have to be someone else's project. 


Tuesday, February 12, 2019

Getting fancy with Spanish Renaissance fashion

 So, I’ve been working on more nalbinding stuff, slowly.  But I drafted a bunch of patterns recently and have been getting a lot of sewing done.  Normally I focus my historical re-creation interests on al-Andalus - the era of Muslim rule in Spain.  However, due to my enthusiasm for Spanish rapier fencing (also called la Verdadera Destreza - my friend Doug has a blog with great info on it) I occasionally slide forward into the Siglo de Oro.


The Siglo de Oro (or golden century) is the Spanish term for the later Renaissance.  It encompasses somewhat more than 100 years of the late 16th and early 17th centuries, roughly corresponding to the era of Habsburg rule.  This is the age of El Greco, Velazquez, and Zurbaran; of Cervantes, Calderon, and Lope de Vega. This is also the age of the rapier, which is one of the things I love about it (though they can keep the Inquisition, thankyouverymuch).  


Over time, as I’ve worked on practicing a progressively more historical style of fencing, I’ve been working on the clothes to match.  I came home from last year’s Ducal Challenge with a linen ruff, made by the wonderful Katerina Falconer (who wrote about the process here). She made it based on the examples in Patterns of Fashion 4.  With lots of help from the Elizabethan Costuming group on Facebook, I set about starching and ironing a proper late-16th century style ruff. Here’s the finished result:


Neck ruffs are very much formal wear.  Just as silly and impractical as modern neckties.  However, unlike modern neckties, the process of starching and setting a ruff is somewhat complex.  Carmen Bernis, in El Traje de Hombre al Uso Cortesano, had quoted an account of 1615 (very loose translation by me, with reference to others' work):

One puts first the loose starch when the water is boiling, stirring always in one direction, because if you turn back across, it breaks and is less strong. To take it off the fire, you must not ignore the appearance, it must turn clear, because until that point it is not cooked.
Half an hour before taking it out, there must be blue powders in the water, which must be put in before it cools, so that they are well incorporated.  How much quantity, certainly it will be enough starch for the collars and enough powders for the starch.  They come out more clear if they dry in the sun; and if it is Spring, you don't have to let them get  to be almost dry, because the starch sits well, and there is danger of breaking if it is left to adhere too much. If done otherwise, at the time you want to open [press] them, even if they are sprayed a lot, the water is not caught in the folds, so that the spraying is the same, nor is the starch and the blue well seated, if not made layers [?], and some portions stiff, some soft.  
To dry them by the fire, it is suitable to make the starch a bit stronger and more cooked. 
It is very useful (if there is time) to air them out a bit after they are starched, because they soak up the starch and it incorporates better into the cloth, and after you don't have to take it off the fire as much.  Once dry, to open [press] them the most smoothly, they are usually sprayed, and moistening a cloth, they are wrapped in it, placing them in a basket in the way that cloths are arranged for doing laundry.  They are squeezed after this very well, which revives them, and they soften themselves; they come out better if they were sprayed the night before for the following day.  
On opening, one applies the irons according to the width, of course some have more folds than others, and thus they need many molds, of which you must have knowledge, to fix the faults that they have.  One finds various makes, such as squared, round, and others.  
You can see why I was a bit intimidated!   But, once I decided to just do it, it wasn’t actually as bad as I thought it would be - still time consuming, but not quite as bad.


I used cornstarch, since finding plain wheat starch can be a bit difficult and I was really not up to extracting starch for myself.  But otherwise, the process was similar to the above, if a bit simplified. I cooked 2 TBSP of cornstarch in 1 cup of water until it went from cloudy to clear.  I found this seemed a bit too thick and added some more water. But once it’s the consistency of mucus, it’s ready. I did not bother with tinting the starch. The "blue powders" mentioned in the description above might have really been blue. But it could also refer to something more like modern optical whiteners. Since all the Spanish paintings of this period show bright white ruffs, and my ruff's linen is nice a bleached, I didn't bother with any blue tinting.

I then worked it into the cloth of the ruff. Oddly, the otherwise very detailed description above glosses over this part.  It's a bit finicky, since there’s really no easy way to do it. In theory, if one cooked up a large enough batch of starch, the whole ruff could just be dipped into it to let it soak in and then wring out the excess.  I suspect this may have been done in laundries at the time. However, for setting one ruff, that would have been kind of wasteful. So, I ended up spooning the hot starch mixture onto the cloth and rubbing it around with my fingers to cover the whole surface evenly and soak it in.  

Then, I hung the ruff up to dry overnight. The warning in the period description was apt. I let my ruff dry almost completely (there was a tiny bit of dampness in some of the gathered folds by the seam). And the cloth did stick to itself in some places. Fortunately, I was able to gently peel the folds apart and it doesn't seem any the worse for it.


The next morning, I sprinkled the ruff with water and put it in a ziplock bag, instead of wrapping it and putting it in a basket. On the advice of some experts on Facebook, I put it in the fridge for this portion.  I probably could have ironed it that evening, but was busy so left it to the next day, as advised.


Once I took it out of the fridge, it was pretty stiff.  I used a roll of toilet paper as a makeshift ruff stand, pinning the band around it.  At first I had trouble getting the ruff into an approximation of the figure-8 shape that was the goal.  I ended up doing a rough accordion fold to mark the general shape. Then, it was showtime. The curling iron set came with an insulating glove.  This was very helpful to hold the individual setts firmly against the hot iron in order to get them set. The whole thing took a bit of time and concentration, but with a suitable tool it wasn’t more difficult than, say, ironing a shirt.  All done, it was only about an hour’s worth of work - but it was spread out over 3 days.

The folds are not all completely even, but in portraits they aren't always neat and precise either.  

All in all, this was a pretty successful first try. When I have the energy to go through the process again, I may try doing the setts with a smaller barrel on the iron. This is definitely within the range of the sizes and shapes one sees in portraits of this period. But, I prefer some of the less extravagant versions, like this one. There are also some other issues (such as the failure of the edges to meet neatly at the front) which may be an issue of the proportion of the ruff, or may be my inexpert starching - only time and further practice will tell.


In addition to trying the ruff out at a recent SCA event, I also had my first try with what folks on the Facebook group affectionately call the “Elizabethan onesie”.  It was the practice at the time to use cords or laces to tie one’s breeches to a strip of eyelet holes inside the waist of the doublet. While a bit awkward, it worked out surprisingly well.  It was very comfortable, I was never overly aware of my clothing, and I didn't have to worry about having my shirt show between by doublet and breeches when I bent over. I was even able to handle going to bathroom (mostly) unassisted.


This doublet was my first go at using the Modern Maker's draft and methods.  I highly encourage anyone with an interest in late 16th/early 17th century clothes to check out his books, because Mathew is truly awesome. He also has a Patreon page with video tutorials for patrons.  As a learning experience, I did all of the doublet construction by hand. It was interesting, definitely gave me a good understanding of his methods, but there are several steps that I will probably do by machine in future doublets in order to save time.  This was going to be a simple, basic doublet (made entirely from cloth I had sitting in my closet). But this wool twill, while nice, was just. so. red. I felt it needed a bit of something to break up the color. So, it’s got some black silk bias strips for embellishment.  


The breeches are the latest iteration in my pursuit of the super bulbous silhouette exemplified by El Greco’s portrait of Vincenzo Anastagi. The outer fabric is a basic wool twill suiting, but it’s backed with a seriously stiff linen canvas.  The canvas is kind of rough, though, so that is backed with a lighter wool twill as a lining. The gathering thread runs through all three of these layer, creating some nice and fluffy folds. I think it does a decent job of standing out from the body.  But doesn’t quite reach Anastagi’s level. The pattern is also made from the Modern Maker’s drafting system.


The outfit is finished off with a bunch of accessories that are not new and, while passing the 10-foot rule, aren’t QUITE totally historically accurate.  The knitted stockings are cotton, not wool as would be more appropriate for the era. The hat is a kind of in-between creation that isn’t quite any particular period style.  And the shoes are modern clogs because there was a lot of snow on the ground and I needed the thick soles - although I should note that the shape of the uppers is similar to shoes that one can find in late 16th century artwork (and a couple of surviving examples).  While the ruff makes this outfit a bit more formal, there really should be another layer on top of the doublet as well - usually this would be a jerkin/sayo/ropilla of some sort, but could have been a long coat/gown or cape/cloak or some sort. I had a cape but it spent the entire day draped over the back of a chair because the hall was so warm.  You can kind of see it at the right edge of the photo (but I didn't make it, so we'll just leave it aside).

Thursday, November 01, 2018

Stitch variants among Egyptian nalbound socks


So, in speaking with people (both online and IRL) about the nalbound socks from Egypt, there seems to be a lot of interest in the different stitch types that were used. While I did discuss the different types of stitches a bit in my previous post (here) I didn't really explore in detail all the different types of stitches that have been documented in detail.

The text that I used as the basis for that post was part of the explanatory material of a poster-style display I put together. The display included samples of all the different stitch types. I still feel that being able to feel the differences in texture and thickness makes a huge difference in appreciating the variety that can be achieved with different nalbinding techniques. However, a lot of information can be gleaned from pictures. So, I'm putting up some photos of my stitch samples. Hopefully, this will be of interest to someone other than me. :- )

All of the samples in this post were done with a commercial yarn in worsted weight. (Brown Sheep's Nature Spun, for those who are interested) This is much coarser than the yarn in any of the surviving socks from the post-Roman era. But, I felt that it was useful to use a larger yarn in these samples.


Coptic stitch and its variant

The most common stitch found among the Egyptian socks is referred to by most nalbinders as the 'Coptic stitch'. It is also sometimes called the 'Tarim stitch' in reference to a very old hat found in the Tarim basin of western China. The vast majority of the Roman-era and post-Roman socks from Egypt are made in the Coptic stitch. This is the stitch that very closely resembles knitting. Here are photos of my Coptic stitch sample:
Front side of the Coptic stitch. This is held in the orientation in which it was worked. I usually work my stitches crossed in the S-direction because this seems to be the most common in the surviving textiles. 
Reverse side of the Coptic stitch. This looks exactly like the reverse side of knitting. 

There is one sock in a variant of Coptic stitch. I have not seen any published analysis of this stitch, but Dorothy Burnham, in her seminal article on these socks (Burnham, Dorothy. “Coptic Knitting: an ancient technique.” Textile History. vol. 3, No. 1, Dec 1972. pp 116-124.) refers to one sock which "departs from the normal type". Having tracked down her reference to a publication from the Victoria & Albert Museum, it seems that she was referring to THIS child's sock. There is a stripe of 3 or 4 rows in the standard Coptic stitch across the instep. However, the majority of the sock is done in a different, but related stitch. Based on analysis of the museum's photos, I am highly confident that the sock is worked in what Ulrike Claßen-Büttner describes in her book (Nalbinding – What in the World Is That?, Books on Demand, 2012.) as "pierced looping". In the Coptic stitch (which Claßen-Büttner calls "encircled looping") one passes the needle behind the crossed legs of a stitch in the row below the one being worked. In "pierced looping" the needle passes through the loop of a stitch in the previous row. Here is my sample of pierced looping.

Pierced looping outside 
Pierced looping reverse side (looks the same, essentially) 

I am not aware of any other surviving Egyptian socks in pierced looping. It's tempting to speculate that the maker of this sock was attempting to work the Coptic stitch, but was mistaken as to how to make it properly. However, the presence of the band of true Coptic stitch in this sock refutes that idea, since the maker then resumed the pierced looping technique again. You may also have noticed that my sample included several rows of true Coptic stitch. This does not seem to affect the drape or elasticity of the fabric. So, I must assume that it was included purely as a decorative element.


Complex nalbinding stitches

As I mentioned in my previous post, there exists a sizable number of socks from Egypt in more complex nalbinding stitches. For my purposes, I am using the term 'complex stitch' to refer to any nalbinding stitch where stitches are interlinked within the same row as well as linking to the rows above and below. Gudrun Böttcher analyzed a large collection of socks from the Museum der Kulturen in Basel, Switzerland (Böttcher, Gudrun. “Nadelbindung – Koptische Textilien im Museum der Kulturen Basel und im Städtischen Museum Simeonstift, Trier” Archaeological Textiles Newsletter. No. 39, Autumn 2004.) and found 9 different stitch types. There are a small number of socks in complex stitches held elsewhere. I have not found any detailed analysis of the stitch type in these, but visual analysis of the available photos suggests that they are in the same stitch families that Böttcher found.

The most common stitches in Böttcher's analysis were variants of the Mammen or Korgen stitch (UOO/UUOO). There were 3 different connection stitches used with this stitch, which create slightly different looks. The first set use an F1 or F2 join. These are the most basic type of connection stitch. The needle passes through either 1 or 2 loops on the edge of the previous row, from the front.

Front side of Mammen stitch with F1 and with F2 join 
Reverse side of Mammen stitch with F1 and with F2 join
There are also examples of a joining stitch that picks up stitches from the middle of the row below. I have used a more common notation of M1 - meaning that 1 loop was picked up from the middle of the previous row. However, Böttcher uses a more precise abbreviation F(L) 2.1 - to indicate that on the front side, from the left edge of the previous row 1 stitch is picked up from the second rank of loops. (note that my photos have a sample with an M2 join, but this is not attested in the surviving examples) By joining into the middle of the previous row, the bypassed edge forms a ridge on the reverse side of the work. The surviving socks in this stitch seem to have been worked inside-out so that these ridges are on the outside.

Mammen stitch with joins to the middle of row 
Reverse side of the Mammen stitch with middle joins, showing the ridges characteristic of this connection type. 
The next group of samples are variations on the Oslo stitch (UO/UOO). This is closely related to the Mammen stitch and is often the first stitch that beginner nalbinders learn. As with the Mammen stitch, it can be done with either an F1 or F2 join. Also, like the Mammen stitch, the appearance of these two are very similar. The connection between the rows is a bit thicker with the F2 join, but otherwise they look the same. The other variation (lower left in the photos) is UO/UUO - it is a bit more awkward to do, as one loop is bypassed when making the stitch. However, as you can see, the final appearance on the front is very similar to the others (but the reverse is different).
Oslo stitch variants - front side
Oslo stitch variants - reverse side
Three of the socks in the Basel collection use a single-phase stitch - that is, one where the needle passes through all loops in the same direction, rather than weaving in and out. These are related to the stitch used in the famous Coppergate sock found in York. The York or Coppergate stitch is UU/OOO F2. The variants described by Böttcher are UU/OOO F3 and UUU/OOOO F4. The appearance of all is basically the same. However, the difference is more apparent when the work is held in the hand. This stitch basically creates a spiral of yarn for each row. The joining stitches travel through the center of this spiral. So, when an F4 join is used, there are 4 yarns in the middle of the spiral at any given point. This results in very pronounced ridges. The sample with an F3 join has less pronounced ridges, as there are only 3 yarns in the center of each row's spiral. The York stitch (not shown here) is smoother, as there are only 2 yarns in the center of each row's spiral.

Single phase stitches - front side
Single phase stitches - reverse side (same appearance)

The last stitch is highly unusual. In fact, it is almost impossible to describe with Hansen's notation. The basic stitch is simple enough - it is the Danish stitch, one of the most simple types of nalbinding stitches. Böttcher's attempt to describe it is B(L) 2.2 U/OU. By this she means that the connection stitch is made from the back of the work, taking 2 loops in the second rank from the left (or top) edge of the previous row. As always, a picture is worth a thousand words.

This is Böttcher's diagram of the stitch. The left side is showing the front (outside) and the right side shows from the reverse. I made my sample before I had gotten a photo of the sock itself. My sample has a much higher tension than the museum's sock, creating a very dense, almost double-thickness fabric. The actual sock is kind of lacy and looks more like these diagrams.

Front side 
Reverse side
I have my doubts as to whether this sock is actually nalbound. None of the items in the Basel collection have been carbon-dated. A few items have the specific location where they were found listed, but in general the museum's records generally just state "Egypt, nalbinding" with no further information on provenance. It is possible that these socks were acquired as a lot. The appearance of the sock itself is strikingly similar to crochet and the structure, as diagrammed by Böttcher, can be produced in more than one way. For more details on the ways in which different yarn-looping techniques can produce identical structures, I highly recommend the Loopholes blog which explores various yarn-looping techniques. The specific post linked to here contains a diagram of asymmetrical chain loops that looks a lot like the diagram above.

So, those are all the stitch variants I have found attested in surviving nalbound socks from Egypt. It's important to note that the Mammen F2 and Mammen M1 stitches are the only ones for which more than one or two examples are attested. Whether this relates to the actual frequency of use in the period is an open question, since it's almost impossible for us to know how representative a sample the surviving socks are. Additionally, the number of socks in the Coptic stitch is far greater than the number in complex stitches. Again, it is impossible to know how accurately this reflects the relative frequency of production in the period. But, it is quite likely that socks in the Coptic stitch were significantly more common than those in complex stitches.

Lastly, for more details on how to make these stitches, including videos, I highly recommend the marvelous Neulakintaat website. Happy stitching!