Saturday, March 12, 2022

An Overview of Medieval Fashions

     This started out as a handout I created years and years ago to talk about medieval fashions.  As the SCA is emerging from our collective isolation and starting to meet up in person again, we're having small educational meetings.  So, I revisited my old handout and expanded it a bit to provide a brief overview of fashion for folks that are new to studying this era or new to historical re-creation.  

    A brief word about scope:  this was intended to be an overview of Medieval, western European fashions.  So, the scope is basically from the "Fall of Rome" (approximately the 5th century CE) until the later 15th century (which was my arbitrary choice for the transition from the "middle ages" to the "renaissance").  For my purposes, "western Europe" is basically Latin Christendom, even though I start out in pre-Christian times for some areas.  

    The collection of images can be found as a PDF HERE

    I hope that this collection of pictures is helpful!  Most have an indication of where the image came from, so that you can track down more information on them if you choose.  


Sunday, October 18, 2020

Reproducing Linen Trousers from Roman Egypt

SEEKING CROWD-SOURCED HELP

I'm putting this post up now, but it's really not quite ready.  Below, I've laid out my best approximation of how to pattern some interesting trousers (possibly better described as underwear) from Roman Egypt.  

These proportions worked out very well for me.  However, I've not had any opportunity to try this out on people with different body shapes than mine.  I'm hoping that by putting this up here, I can get other re-enactors out there to help me out by trying this and seeing how well it works for a wider range of bodies.  So, if you're reading this and you think these trousers are kind of neat - please try this out and let me know how well these proportions work for you.  

You can find a link to email me, by clicking on "view my complete profile" in the right-hand sidebar.

_________________________________________________________________________________

Romano-Egyptian linen trousers

            Most investigations into the clothing of Egypt in the Roman era (sometimes called Coptic era) focus on the elaborately decorated tunics that have survived.  But, what did they wear underneath?  It turns out that there are 4 extant linen trousers from Roman (Byzantine) Egypt.  A marvelous article analyzing these trousers is available online (here).  Two of them were subjected to radiocarbon dating and both are from the late 6th or early 7th century CE.  I highly encourage anyone interested in these garments to read Kwaspen and De Moor’s article.  This brief tutorial will focus on the process of reproducing this style of trousers.

            The 4 trousers that Kwaspen and De Moor analyzed are all constructed in the same way, with some slight variations.  The internal proportions of the pieces are relatively similar among them as well.  This enabled me to reproduce a pair sized to fit me and assess the fit based on proportions of my measurements. 

            It must be pointed out that the construction of these trousers is completely unlike modern pants.  The fit is likewise unlike modern pants.  The use of a back panel and triangular gussets create a shape that seems much baggier in the rear than any sort of modern pants.  However, this room easily accommodates the movements of the body in a wide range of positions.  It’s unclear to me whether these trousers were worn by men, women, or both.  However, the cut of the gusset is particularly well-suited to accommodate male anatomy.  As an interesting side note, the construction of these Egyptian trousers has some similarities to northern European finds from earlier in the first millennium. 

            As Kwaspen and De Moor point out in the article, there is no evidence that any sort of physical pattern was used by the people of this time – and quite likely the cut was known well by those who made them.  Since the pieces that make up these trousers are all simple geometric shapes (rectangles and right triangles), it is easy enough to mark the necessary measurements directly on your fabric.  Be sure to double check your measurements – measure twice, cut once!  

            The original trousers are made from linen that (in most cases) seems to have been repurposed. In some, different pieces of the same garment are cut from different cloths.  They range from 13-35 threads per centimeter.  So, a lightweight or medium weight modern linen would be suitable for a reproduction. 


Measurements

Cutting the pieces for these trousers only requires 3 measurements:

Hip measurement (H) – is the circumference around the widest part of your hips and buttocks

Outseam length to the ankle (OA) – this is the full length of the pants from where the drawstring will sit to the ankles

Outseam length to the knee (OK) – This is the length from where the drawstring will sit to the knee

             One of the pairs of surviving trousers is knee length, and if you want to make a knee length pair, you will only need to measure the outseam to the knee (OK).  If you want full-length trousers, measure to the ankle also (OA). 


Pattern pieces

            The main body piece is a large rectangle.  The width will be 3/4 of the hip measurement (H) and the length will equal the full outseam (OA).  You will also need to mark the top of the slit.  Measure down from the midpoint of the top edge 1/8 and mark this point.  The main body piece will be slit from the bottom up to this point. 

            The back panel is also a rectangle.  The width will be 3/8 H and the length will be ½ H + 2 in/5cm.  The extra length is will be folded over to make a channel for the belt. 

            There will be two triangular panels.  The length will be 1/2 H.  The diagonal will be OK.  Mark a vertical line of length 1/2 H on your fabric and mark two lines perpendicular to this.  These will be the top and bottom.  Measure from the top of your vertical line and find the point where a measurement of OK meets the bottom line.  This will show you width of the rectangle.  Cut out the rectangle and then cut it in half along the diagonal line.  . 

            The last piece is a crotch gusset.  The crotch gussets on the extant garments are not perfectly square.  But, for simplicity we will be cutting our crotch gusset as a square.  Two of the surviving trousers have a gusset that sets into slits on both the main panel and the back panel.  One has a triangular crotch gusset that sets into only the slit in the main panel.  The last has no crotch gusset at all, but this would create a very high-stress point where a straight edge from that back panel sets into the slit of the main panel.  I would not recommend this construction.  I actually got a better fit using a triangular gusset seamed to the bottom of the back panel than I did by setting in into a slit. 

            The crotch gusset is based on a square, with each side 1/8 H in length.  For these instructions, you can cut that in half along the diagonal. 

            Lastly, you will need 4 belt loops that will be attached to the top of the main panel.  I made mine by using a strip of selvedge from my fabric.  Kwaspen and DeMoor don’t explicitly list the size of the belt loops on the originals.  I used a strip 2 inches wide, folded in thirds with the selvedge on the outside, then cut into 3 inch long pieces. 

Please excuse my poor skills with computer graphics.  I hope these diagrams are clear.


I have used ½ inch/ 12mm seam allowance throughout (except for the belt channel, which is described below).


Order of construction

            The original garments all have seams that are stitched and then flat-felled.  This arrangement allows the order of operations to be deduced.  It can be done either by hand-stitching, or by machine.  To reduce bulk, I recommend trimming down one seam allowance on each seam before folding them over to make the flat-fell seam. 

            First, sew each triangular panel to the sides of the back panel.  The long leg of the triangle (the side which you measured at 1/2 * H) is sewn to the back panel.  Match the bottom (short leg) of the triangles to the bottom of the back panel.  Press these seams toward the back panel to flat-fell the seam allowances.  When pressing the seam allowances to make the flat-fell, you will also press a double-fold hem for sides of the back panel above the point of the triangular panels. 

You can then fold down the extra 2 inches at the top of the back panel.  Fold these 2 inches to the outside.  Fold the raw edge under and stitch this down to create a channel for the belt. 

Match the middle of the bias edge of the crotch gusset to the middle of the bottom edge of the back panel.  Stitch the gusset to the back panel.  Press these seam allowances toward the gusset, but don’t flat-fell them yet.

Stitch a double-fold hem along the top edge of the main panel.  Cut a slit up the middle of the main panel from the bottom edge to the marked point (1/8 H from the top edge).  If you will be making full length trousers, you should mark the knee level on both sides of the main panel and both sides of the slit.  This will be at OK from the top edge.  Set the corner of the crotch gusset into the top of the slit.  Continue stitching the sides of the gusset, then the back panel and triangular panels to either side of the slit.  Stop stitching at the point that marks the knee level.  The point of the triangular panels may go past this.  That’s fine and if it does, you will trim it off later. 

To flat-fell all these seams, first fold under and stitch the seam allowances for the seams joining the crotch gusset to the slit.  These will be pressed away from the gusset.  As you approach the edges of the gusset, trim down the seam allowances.  You can now flat-fell the remaining seam allowances here as one long seam, pressing the seam allowances toward the main panel (toward the gusset in the middle of the seam). 

On each side, stitch the side of the main panel to the hypotenuse of the triangular panel.  Again, stop stitching at the mark for knee level.  If the point of the triangular panel extends past this point (or if it extends past the knee marking on the slit) trim it off.  Fold seam allowances toward the main panel and flat-fell those seams.  The folding from the flat-felling will continue naturally into a double-fold hem on both sides of the main panel and both sides of the slit below the knee level.  (see the diagram below)  Stitch these hems.

 If you had to trim off the points of the triangular panels, make a narrow hem along that cut edge.  Stitch a hem along the bottom edge as well.  Lastly, attach your 4 belt loops to the top of the main panel. 

I'm including a line diagram of one of the surviving trousers from the Kwaspen and DeMoor article here.  The solid lines indicate seams and the dotted lines indicate the direction the flat-felling is folded.  If this is unclear, please follow the link at the top and read the paper itself for more details. 


Diagram of surviving trousers by Kwaspen and DeMoor

To wear these trousers, a belt of some sort must be threaded through the channel at the top of the back panel and through the belt loops.  There is no evidence as to what sort of belt was used with the originals.  I have used a length of twill tape, tied at the front.  However, a cloth or leather belt with a buckle would also be a justifiable choice.  The legs are left open at the back below the knee.  The originals have ties attached at the corners of the hem.  Thus, it is assumed that these sides were tightly wrapped around the lower legs.  Again, Kwaspen and DeMoor have some photos of their reconstructions in the article and I encourage everyone to read it.  


Saturday, August 15, 2020

Finding the Intersection of Authenticity and Safety

 Clothing vs. armor – What to wear for fencing?

            I wrote this up with the intent to present it at a display at an event this spring which was cancelled.  I came across the mostly finished write-up, going through some files on my computer and figured I may as well put it up here for those who may be interested.  

 The concept:

            The rules for rapier fencing in the SCA presume that fencers are wearing “common civil attire” for the purposes of acknowledging blows.  The rapier was, indeed, a civilian weapon – used for self-defense, affairs of honor, and occasionally brawling, but not typically on the battlefield.  So, this convention makes perfect sense. 

             However, for reasons of safety there are certain requirements for the clothes worn by fencers in the list.  These requirements regulate the type of fabric and number of layers in order to minimize the risk of injury.  These requirements don’t always match up with typical clothing construction from the pre-1700 era.  Most fencers implement the protective requirements by building additional layers into a garment that would not normally have them, or by using modern materials underneath a more period-appropriate item. 

             Since I practice a Spanish style of fencing (first described in writing by Jeronimo Carranza in his book which was published in 1582), I have been focusing on Spanish clothing of the 1570s-1580s.  Attire for a gentleman of this era would typically consist of several layers.  (Gnagy)  So, my goal with this project was to see if I could create an outfit for fencing with as few deviations from historical construction methods as possible. 

Fencing suit, version 1 (before the Unfortunate Incident)


Planning:

            The SCA rules for fencing include several requirements that I did not try to adjust.  This mainly had to do with “rigid material”.  There is not really any part of normal clothing that would use these sort of materials.  So, I accepted these as the necessary intrusion of modern considerations into my fencing attire.  The “rigid materials” include groin protection (worn under the clothing), a fencing mask (definitely NOT optional), and neck protection (in my case, a leather gorget worn over the clothing). 

            The primary considerations for this project were the construction of the main body garments.  These are the doublet, breeches (calçones), and the sayo (the outer garment, which could be called a jerkin in English sources).  These will each be considered separately.  The rules also require complete coverage of the back of the head, with no bare skin showing.  This requires a sort of garment that is essentially foreign to late 16th century fashion, but I did create one that was ultimately rooted in it.  All these garments count as “puncture resistant” – able to withstand 1.5J of force over a 5/32” diameter circle in accordance with the rules’ procedures for punch testing. 

            In addition to the items constructed by me for this project, there are some additional accessories that require no modification to comply with the SCA fencing rules. 

The shirt, as underwear, is essential to dressing in 1580s style.  However, as underwear, I did not consider it in my reckoning of the number of layers required.  It is essential for wicking of sweat, especially in hot weather.

The legs must be covered by “abrasion resistant” material.  Period-appropriate knitted stockings meet this criteria.  Stockings in the late 16th century would have been knitted from wool or sewn from woven linen.  (Arnold)   Knitted silk stockings were also known, but would be inappropriate for anything short of fancy occasions.  While I may eventually sew some linen hose, I decided not to expand the scope of the current project too much.  Knitted wool stockings are readily available.  However, while these are fine in cooler weather, they are not usually thin enough to be comfortable for me in hot North American summers.  At Pennsic, I compromised with knitted linen stockings.  There is no evidence of knitting with linen in the 16th century, however. 

The fencing rules require shoes that completely enclose the foot.  I have a pair of leather reproduction shoes that work well.  However, under very muddy conditions at Pennsic I did resort to some period-ish wooden clogs (photo).  

Lastly, the rules require gloves of at least “abrasion resistant” material.  I am not a glover, so I use commercially produced gloves.  They are made with leather and the cut is not too different from surviving late 16th century gloves. 

Choice of materials:

            The SCA fencing rules do list standard materials that are known to meet the standard of “puncture resistant”  as well as testing procedures to assess puncture resistance.  Other than leather, the listed examples are not typical of fabrics used for common everyday clothing in the late 16th century. 

Surviving examples of clothing from the 16th century are often silk. (Arnold, Braun et al.)  However, this is clearly survival bias and internal structural layers of these fancy clothes are of linen and wool.  Everyday clothing would almost universally be made from wool as the primary material, with wool and/or linen interior layers and linings.  (Gnagy, Johnson)  Linen, in addition to use for undergarments, was occasionally used for doublets and jackets as well.  This use is attested in Spanish colonies in America and the Caribbean.  (LaPorta) 

Since the clothing I made to fence in would be subjected to significant wear, it needs to be sturdy.  It also needs to be worn during occasionally vigorous exercise, sometimes in very hot weather.  Since it is difficult to find densely woven, sturdy wool in a weight other than those intended for winter coats, I have chosen to use linen for all parts of these items.  Linen canvas doublets are known from this period.  Outer garments (jerkins, sayos, ropillas, etc.) would probably not have used linen as the outer layer.  However, heavier weight linens were known and used for the internal layers of tailored garments.  So, in the absence of suitable wool fabrics I have made the sayo and breeches out of a heavy weight linen as well. 

Since the complete outfit would consist of a doublet and breeches under a sayo, my estimation was that the combination of the layers in the doublet and the sayo would meet the required puncture resistance.  Not counting the linings, the doublet has one layer of heavy linen canvas and the sayo has two.  There is additional linen in certain areas, as required by the tailoring methods, but puncture resistance must be measured in the most vulnerable part of the torso clothing (the fewest number of layers).

The Doublet:

            The doublet is the foundation of men’s clothing from the late 16th century.  Aside from the use of machine stitching for many of the construction seams, this doublet was made without any deviation from typical historical construction methods.  The pattern was drafted using Mathew Gnagy’s reconstructed proportional system and construction mostly follows his recommendations based on analysis of extant garments. (Gnagy)  It is a single layer of linen canvas, with additional reinforcement of the same canvas used in the buttonhole areas and the collar.  A lightweight linen was used for lining.  The buttons are ball-shaped metal buttons.  Cast metal buttons were known in this period, and would have been a cheaper alternative to expensive jeweled buttons, or buttons wrapped in silk thread (which are seen on higher class surviving garments).  There is a strip with eyelets inside the doublet waist to use for attaching the breeches. 

The pieces of this linen canvas doublet are shaped as Gnagy describes (using steam to stretch certain areas) even though there is no interlining layer for the body.  However, a padstitched piece of canvas in the collar provides essential support for it to hold its shape.  Seen here before the buttons and buttonholes were made.  

The Breeches:

            The breeches pattern was also drafted from Gnagy’s method.  The SCA rules only require abrasion resistant covering on the legs, but since the breeches do cover the lower part of the torso, I have to consider them in the overall outfit.  I used the same heavy linen as the first version of the sayo for the outer fabric.  The same canvas used for the doublet was used as a lining.  Aside from the use of machine stitching for some construction seams, the construction mostly followed historical methods.  The single deviation is discussed below.  One huge advantage of the historical construction is the use of lacing holes on the waistband the tie the breeches to the doublet.  This essentially prevents any possibility of gapping between the breeches and doublet which would expose non-puncture resistant underlayers.  I am currently using cords made by loop braiding linen thread.  As a utilitarian garment, I tried to just make wrapped thread ends, but these are proving less than satisfactory.  I intend to put plain metal aglets on the ends of the points. 

            A significant safety consideration in the construction of the breeches was the form of the button opening.  This style of breeches, which appears in the 1570s-1580s (photos), lost the ornamental codpiece that was typical of men’s clothing of the mid-16th century.  The necessary front opening was closed with buttons.  However, in portraits these are often not seen.  Gnagy reports that surviving examples use a deep pleat at the center front to cover the buttons.  This configuration is surprisingly practical for safety purposes.  A strip of fabric with buttonholes extends from the left front of the breeches.  The buttons are sewn to the right front.  In order for a broken blade to slip under this fly, it would have to come from the right.  But, the right edge of the fly is never exposed due to the deep pleat covering it and the fullness of the breeches. 

            This configuration would probably have been enough for safety.  But I added another buttonhole stand extending in the opposite direction on the inside.  I will admit that a partial consideration here was that I couldn’t decide whether to cut the breeches from the same cloth as the doublet or the sayo (both ways are shown in the cutting layouts of Freyle’s tailor’s manual).  With a little planning, and the addition of the second button stand, I have effectively made the breeches reversible.  This is in no way supported by any historical practices.  But, I like the idea of effectively having two pairs of breeches for the effort of one. 

The Sayo:

            The sayo was originally cut from the same heavy linen as the breeches, with a linen canvas interlining and a loftier linen for the tailored padding layer.  The lining is a lightweight linen.  Again, the pattern was drafted using Gnagy’s system with construction in line with his methods.  Again, machine stitching was used for many of the construction seams.  I have made the sayo to button right-over-left, while the doublet buttons left-over-right.  The direction of buttoning was not standardized in the 16th century and examples of both can be found.  While I find left-over-right much easier, as a right-handed person, right-over-left has two advantages in this instance.  Firstly, it has the opening facing to my left, which is usually the side away from my opponent.  This reduces the risk of a broken blade sliding in between the buttons.  Secondly, by using opposite buttoning for the two layers, it further reduces the chances of any broken blades penetrating fully. 

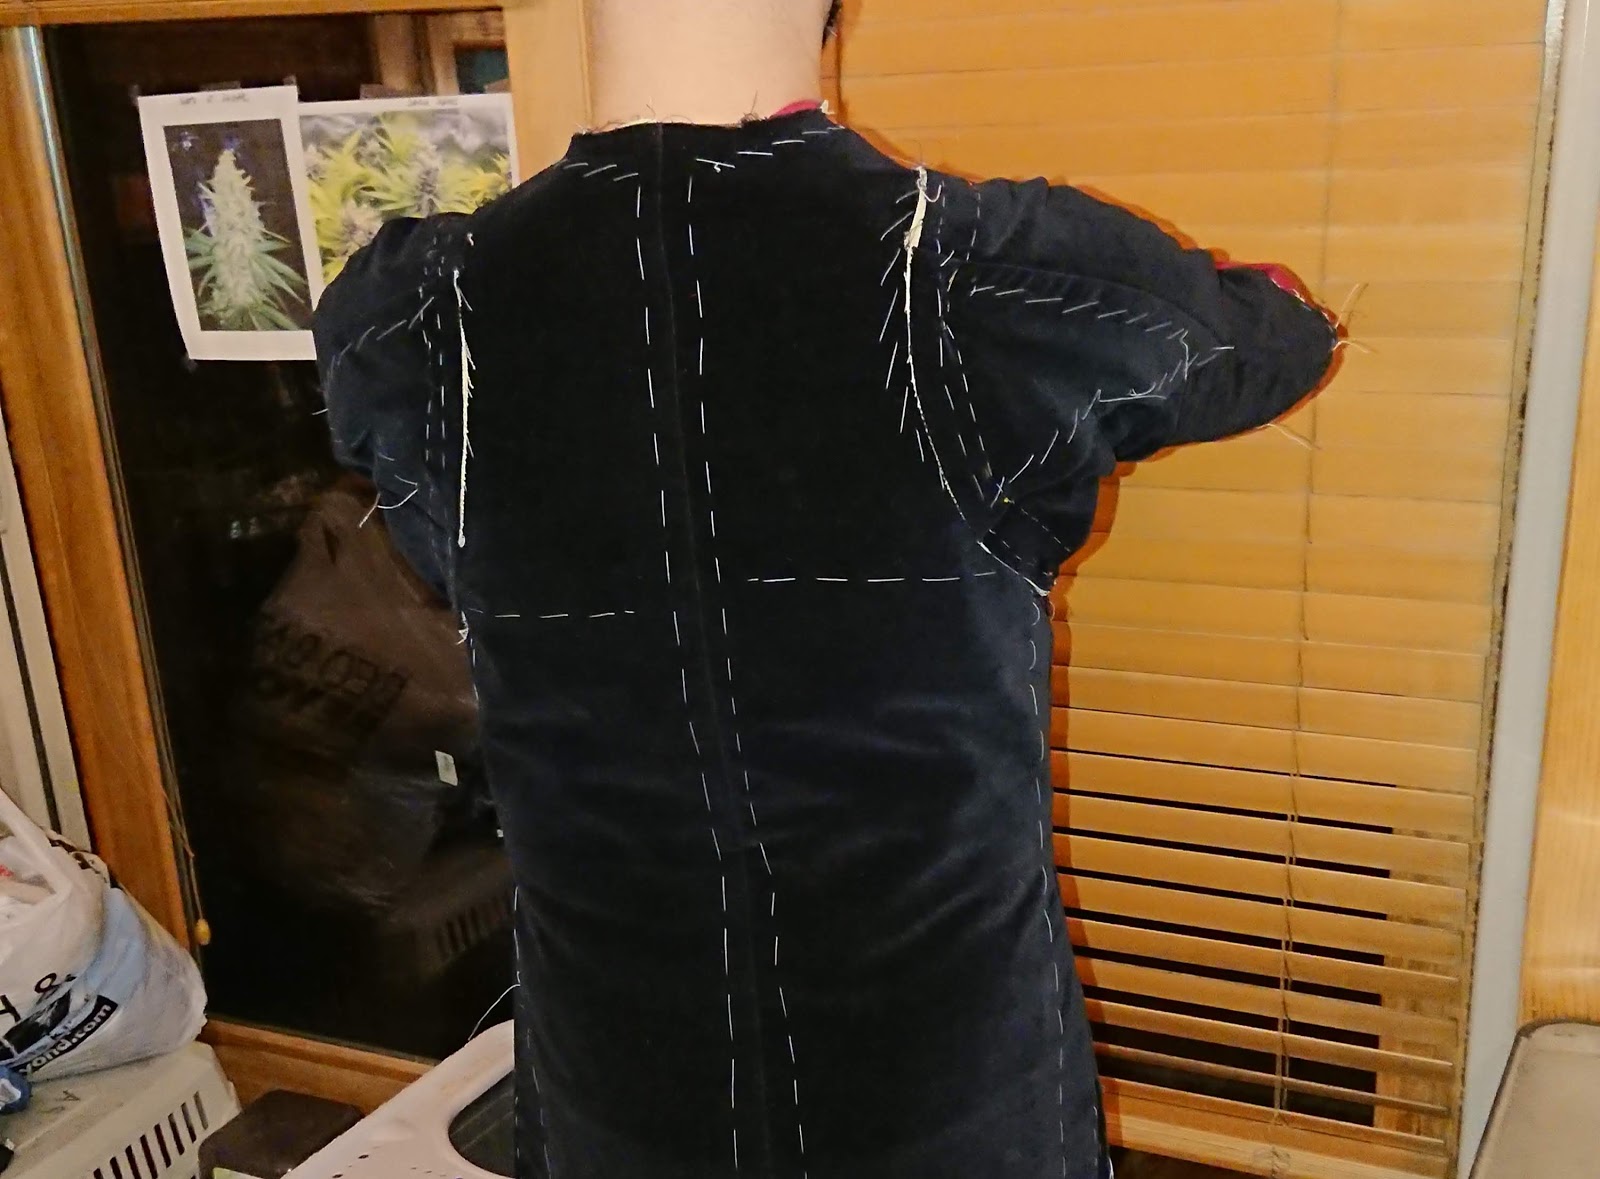
Machine pad-stitching on the interlining layer of the sayo. The 'padding' is actually the same canvas as the interlining itself.  This provides no real contribution to the protective aspect of this garment, but is essential to the construction process that gives the garment its shape.


            My original plan for the sayo had been to use a short-sleeved style.  The SCA fencing rules require puncture resistant material in the armpit, covering the upper part of the inner, upper arm.  The remainder of the arms only require abrasion resistant material.  Short sleeves are rare, but there are several portraits from the 1560s showing men with short-sleeved overgarments (jerkin, sayo, etc.).  The original plan was to make sleeves only as long as the portion of the upper arm that needs to be protected with puncture resistant material.  However, after two attempts, I could not find a configuration of short sleeves that I felt would not allow a blade to slide up under the sayo sleeve.  So, I changed plans.

            The final version of the sayo has a sleeve shown in tailor’s manuals from just after 1600.  This is called a “manga de armar” in Spanish and usually translated as “arming sleeve”.  I don’t know of any images of this sleeve style, but there are many reasons why it might not be readily identifiable.  It is a one-piece sleeve, cut in a very unusual shape that folds up to create the same shape as a more common curved, two-piece sleeve.  If fully constructed in this way, the arming sleeve would have a seam up the back of the forearm, across the elbow, and then up the front of the upper arm.  The more typical two-piece sleeve has two seams, running the full length of the sleeve at the front and also the back of the arm. 

Since the arming sleeve shape is much less efficient in use of fabric than the two-piece sleeve, I find it hard to believe that 16th century tailors would have constructed the arming sleeve this way.  I suspect that it may have been constructed without sewing any seams at all – leaving the “seam” lines as openings (possibly with buttons or ties) through which the sleeve underneath would be visible, or even puff out.  Gnagy suggests that the seam on the upper arm would be sewn closed with slashes only across the outside of the elbow and down the back of the forearm.  This arrangement suited my purposes even better, as a large opening on the front of the upper arm would be a spot where a blade could potentially get caught.  However, with the upper arm sewn closed I can still put my forearm through the elbow slash, leaving the lower sleeve hanging.  Since the opening here is at the elbow, any blade that slipped up under the sayo sleeve would still not get up past the mid-bicep.  I could put my forearm into the sayo sleeve as well, but having the option to wear it as a hanging sleeve helps reduce layering on parts of the body where it is not necessary – something useful in hot weather. 

Unfortunately, after wearing this suit to fence at Pennsic 48 (2019), I washed it.  Being constructed entirely of linen, it should have been safe to wash in the machine.  However, it seems that I neglected to pre-wash the linen I used for the inter-lining in the sayo.  This shrank during washing, creating a hot mess of a garment that is totally unwearable.  I got myself some more heavy linen and made a second sayo, duplicating pretty much everything I did on the first one.  This is the currently displayed sayo.

Aside from the use of machine stitching, the main deviation from historical construction practices is the use of linen for the outer fabric.  While linen canvas doublets are documented, colored linen was exceedingly rare (LaPorta) and its use for a sayo is questionable. In the absence of sturdy, lightweight wool cloth, however, I felt that this was the better choice for a garment meant to be used during vigorous physical activity.

Version 2.  Replacement sayo with the same doublet and breeches.

Other options/future explorations:

            Initially, I thought that three layers of linen canvas would be required to meet the SCA requirement of puncture resistance.  However, I suspect that the sayo, as made, could pass punch testing on its own.  With proper choice of materials, it might be possible to construct a doublet that functions on its own.  This could include making a doublet with heavy linen canvas for the outer shell and the interlining.  It could also involve use of leather, a very historically appropriate material for clothing and one which would meet the SCA standard of puncture resistance as well.

            There are a few surviving examples which are presumed to be fencing doublets.  These doublets have quilted padding.  While not necessary for complying with SCA fencing rules, there are advantages to having a padded garment for fencing.  This would be more along the lines of recreating a period “fencing armor” than “common civil attire” that complies with SCA rules. 

Historical practice, however, is to stitch buttons to the edge of the garment and place buttonholes very close to the edge as well.  With a single garment, an additional placket of some sort would have to be pinned or stitched behind the buttonholes in order to comply with SCA rules.  My use of two layered garments with opposite-facing button openings eliminates the need for this ahistorical modification. 

Another deviation from historical practice to consider would be to only interline the armpit area of the sleeves.  It seems that doublet sleeves were either fully interlined, or not interlined at all.  However, to eliminate bulk in the sleeves and still comply with SCA fencing rules, interlining could be placed only in the areas where puncture resistance is required.  This would be completely unnoticeable in the finished garment.  Another modern “cheat” that could be combined with this technique would be to cut the layer of padding used in the tailoring to cover the entire body of the doublet, rather than only the chest and shoulder area.  This would add a third layer of cloth to the one garment.  


Sources:

Johnson, Caroline.  The King’s Servants: Men’s dress at the accession of Henry VIII, ed. Malcolm-Davies & Mikhaila, Fat Goose Press, 2009.

Gnagy, Mathew.  The Modern Maker Vol. 1: Men’s Doublets,  self-published, 2014.

Gnagy, Mathew.  The Modern Maker Vol. 2: Pattern Manual 1580-1640, self-published, 2018

              Includes LaPorta, A. “Cloth and Clothing in 16th Century Spanish Florida”

Greco, El.  Portrait of a man, 1570-75.  https://commons.wikimedia.org/wiki/File:El_Greco_-_Portrait_of_a_Man_-_WGA10428.jpg

Mikhaila, Ninya and Jane Malcolm-Davies.  The Tudor Tailor, Costume and Fashion Press, 2006.  

Mor, Anthonis. Portrait of a gentleman  https://commons.wikimedia.org/wiki/File:Anthonis_Mor_Portrait_of_a_Gentleman.jpg 

Moroni, Giovanni Battista.  Portrait of Don Gabriel de la Cueva, Duke of Albuquerque, 1560.  https://commons.wikimedia.org/wiki/File:Giovanni_Battista_Moroni_-_Portrait_of_Don_Gabriel_de_la_Cueva,_later_Duke_of_Alburquerque_-_WGA16256.jpg

Sanchez Coello, Alonso.  Circle of?  Undated. https://blouinartsalesindex.com/auctions/Alonso-Sanchez-Coello-6125171/Portrait-of-a-Man,-three-quarter-length,-with-a-double-layered-lace-cartwheel-Ruff;-Portrait-of-a-Woman,-three-quarter-length,-with-a-double-layered-lace-cartwheel-Ruff


Monday, April 29, 2019

Jupon construction

This will be the final post in my series about making an outfit in the style of late 14th century Iberia.  Part 1 and Part 2 covered my look into visual sources from the period and Part 3 recorded my pattern drafting.  

In case you don't feel like re-reading the previous posts, the short version is that I took my inspiration from these guys on the painted ceilings in the Hall of Kings at the Alhambra:

Now, even though these guys are hunting, my outfit was for a more fancy kind of occasion.  So, I was looking for a more luxuriant look.  I ended up choosing velvet - a cotton velveteen, actually, for reasons of cost.  While it does look great, I felt it was a bit more drapey than this project called for.  So, I used a medium-weight linen canvas to back it.  Since I wasn't using totally historic materials anyway, I ended up just using a light-weight cotton for the lining.  I used some bias-cut strips of silk to face the areas where the buttonholes go.

I did not quilt this jupon.  This was not entirely due to laziness, I promise!  I felt that the texture of the velvet, which is what gives it such a marvelous look, would be interrupted by the quilting stitches in an un-pleasant way.  The one surviving garment of this style is quilted (and is made from a silk brocade, so it can't be dismissed as a technique only for "practical" clothing).  Most images of jupons do have lines that seem to indicate quilting.  However, not all of them do.  There's an argument to be made that this could simply be an artistic choice.  But, I also think it's reasonable to choose not to quilt it.

Unfortunately, I didn't take a lot of pictures throughout the process.  The torso, based as it was on a reasonably well-done basic block, fit fine.  I realized on fitting the body before attaching the sleeves, that because of the grand-assiette style sleeves, nearly all of the wearing ease at the chest could be eliminated.  This required a few tweaks to the upper sleeves.  

 
This was my attempt to confirm the size and shape of the gores in the upper sleeve.  I cut the slits and then pinned the sleeves on top of the body.  Ultimately, trying to do this by myself meant that I didn't get very far, but the shapes and sizes of the openings created by pinning it in this way and putting it on seemed to mostly match the shapes and sizes of the gores.  


So, this is how they looked with the gores set into the slits and pinned in place.  I got a friend to help me fit the exact shape of the armholes after this.  I suspect that having done this once, that a second attempt would require even less fine-tuning.  Part of the key here is that the tips of the gores should sit along the line that a "normal" armhole would make on the body.  Because of the way the upper sleeve was drafted, this means that the armhole along the side seam actually has to be a bit further from the "normal" armhole that it does on top of the shoulder.  This can be calculated, but I think there's probably more factors that I haven't realized yet.  I also used the fitting to determine exactly how high the slits at the bottom of the side seams needed to be to allow for full range-of-motion at the hips.  


These are the upper sleeves, one inside-out.  You can see the cone shape that the gores create.  I do kind of like this as a solution to creating a fitted garment which still allows for good shoulder range-of-motion.  


Here is one of the lower sleeves, before being attached to the upper sleeve.  It was constructed in its entirety, including the lining and all the buttonholes before attachment.  Because I did "cheat" with some machine sewing, this was actually a much easier way to do it.  It's also undoubtedly the way one would do this with construction entirely by hand.  I stitched this to the bottom of the upper sleeve, then stitched the upper sleeve lining on and basted it up into place.  This leaves all the seam allowances turned up, away from the elbow, which I think is desirable.  Likewise, I stitched the upper sleeves, lining and all, into the armholes.  This left those seam allowances to be pressed toward the body, which I'm not sure about.  But it seemed to work out ok.  

The body lining was assembled and partially bagged, so I could do some of that stitching on the machine.  But, I did tack the lining seam allowances to the outer fabric's seam allowances.  The buttons are a bit large for this era, but the design of these particular buttons struck me as very suitable for this project.  The spacing is a bit much, too, even for the size - but that's how many I had.  


And, here's the finished product.  Unfortunately, it's hard to photograph velvet and most of the detail of the construction gets lost.  

The hood is made exactly on the pattern of Norlund's type B hoods, out of a changeable silk taffeta with a plain silk lining.  I really should have a plaque belt, but I am not committed to this time period enough to spend that much money on jewelry.  So, I used a somewhat lower class belt that is still appropriate to the period.  The hosen were purchased and are not proper bias-cut hose, though I did use garters below the knee. 


Wednesday, April 10, 2019

Drafting a gipó

So, I outlined my search for distinctly Iberian 14th century clothing here (links to Part 1 and Part 2).

I decided to use the hunters from the ceiling of the Alhambra as my models.  Here is a link to a reasonably close shot of three of them.  As I discussed in my prior post, I suspect that these close fitting garments (that many re-enactors would probably call a cotehardie) are probably constructed more like the gipó or jupon.  Since the surviving pourpoint of Charles de Blois is an example of this type of garment, this gives me useful information on actual construction.  The pourpoint actually has a very interesting sleeve construction, which I thought might be fun to try (although I'm still not keen on the number of buttonholes this will take!)


I am greatly indebted to Tasha Kelly, who has lots of information about this style on her blog: La cotte simple.  Her articles saved me from a lot of trial and error.  The Charles de Blois pourpoint uses a construction method called the grand assiette, which involves a very large armhole - there is only a few inches between the center front edge and the armhole seam.

I started with a basic block for my torso.  This is meant to be a closely fitted garment, so I used the minimal amount of wearing ease.  I then extended it down to where I think the hem will be.  I added width down to the level of my hips and then just drew lines straight down from there.  I don't need to worry about having extra fullness at the hem to allow for movement.  There are two reasons: the garment is so short that this won't be much of an issue and the side seams will be left open from just below the hips (as seen in the image above).  I'm estimating 11" below the waist for the hem, but I'll double check this at fitting.  Since I will not be recreating the exaggerated pigeon-chested silhouette of Charles de Blois, I didn't think I would need or want the enlarged armholes to be quite as extreme. So, I drew in a curve 2.5" from the armscye on my front and back pieces.  These are the resulting pieces:


Yes, my center front is straight, not highly curved like Charles' pourpoint. He obviously did more situps than I do.  :-)  

There are several features of Charles' pourpoint that I am not imitating.  The first one is that Charles' pourpoint has a horizontal seam across the back piece (but not the front).  The edges of this seam are both concave, essentially creating a fish-eye dart across the back.  This shaping is necessary to shape to the small of the back and then also accommodate the flare of the buttocks.  However, it is also possible to create this shaping with a vertical center back seam.  This is what I did here, since I've mostly got this shape figured out.  If I had more time to make a preliminary muslin, I might try out the shaping with a horizontal seam.   But, one of the Alhambra hunters has a parti-color jupon, so I think that using a vertical center back seam is totally justified.  

The photo above does not have any seam allowance on the armhole curves, since I expected that the exact shape and position of those seams will require some tweaking at fitting.  When I cut this out, I left a wide allowance on the armholes and the top of the sleeve.  However, I also learned two things when I fitted the body pieces.  The first is that I have an even flatter butt than I thought - I eliminated almost all the shaping at the bottom of the center back.  The second should have been obvious to me if I'd thought about it, but I didn't.

Usually, I draft a basic block with 4" of ease at the chest level.  For a garment with a standard armhole placement, this ease in the body's side seam is needed to allow for arm movement.  However, the grand assiette incorporates the ease needed for movement into the flared upper sleeve.  Because the armhole seam is so far from the shoulder joint, and because the cutting of the sleeve itself creates all the needed wearing ease, that extra fabric on the sides of the body is no longer necessary.  So, I ended up taking out almost all the ease in the side seams.  

In reality, the armhole sleeve needs to pass over, or even closer to the CF than, the most protruding part of the pectorals (what would be the "bust point" on a woman) in order for the sleeve to do all the work of accommodating the shoulder's range of motion.  In fitting, I ended up moving the armhole seams over by an additional 2 - 2 1/2 inches - and they probably could have been even bigger than that.  Live and learn.  

The sleeves that fit into these large armholes are flared by adding triangular gores into slits in the sleeve cap.  In theory, the points of these gores will sit more or less where a normal armhole seam would have.  This will flare out the sleeve top to cover the pectoral muscles and scapular region, to match the shape of the armholes, and still leave a closely fitted tube to encase the upper arm.  Kelly worked out a set of formulas to draft this upper sleeve and figure out the size and placement of the gores.  Her tutorial can be found here and someone created a web form that will do the math for you.  Basically, the upper sleeve is a rectangle, with its lower corners cut off to taper it to the width of the lower bicep just above the elbow.  The extant pourpoint has a vertical seam along the underside of the sleeve, but this seems to be completely straight and was probably done to conserve fabric.  The gores are set in as shown here to create the flared sleeve top (which will cover the pectoral and scapular areas):

diagram from Adrien Harmand's Jeanne d’Arc: Ses costumes, son armure: Essai de reconstitution, 1929

I did make some modifications to Kelly's draft.  She predicated her formulas on the front gore (the one floating above the rest of the sleeve in the diagram above) being a quarter circle.  This is the case in Charles' pourpoint.  But, when I tried drafting it that way, my back gore came out to be slightly over 1 inch wide.  Maybe my chest is smaller relative to my arms?   Maybe Charles de Blois did more bench presses than I do also?  I don't know, but it really didn't seem right for the back gore to be so narrow.  So, assuming that the narrow underarm gore straddles the body's side seam (which it doesn't in Charles' pourpoint, but this assumption made things easier for me) I dealt with the front and back separately.  Matching the lengths along the armhole seam gave me a front gore with about 60 degrees of arc.  Then the back gore was about 6.5" wide and much closer in proportion to the diagram above.  I'll have to test this out in fitting, but it just makes sense that the front gore can't be that much wider than the back one.  

Another feature that I'm not imitating from the Charles de Blois pourpoint is the cuff.  The Alhambra hunters seem to have cuffs that come down at least to the first knuckle of the thumb (metacarpophalangeal joint).  Charles' pourpoint has sleeves that seem to end at the wrist, since they taper to the cuff and in pictures of it they do not seem to have the flare at the cuff.  In order to extend past the wrist, the sleeves must taper to the wrist and then flare out in order to accommodate the size of the hand and movement of the wrist.  

The lower sleeve is relatively simpler to draft than the upper.  Kelly did not put instructions for this on her blog, but she sells a pattern for recreating the Charles de Blois pourpoint.  Her blog implies that she prefers to drape the pattern for the lower sleeve.  But, since I would have had to drape this on myself I figured drafting would be easier.  I will try to write up more detailed instructions on what I did once I can create some clearer images to illustrate it.  However, those with experience in drafting patterns will probably be able to figure out what I did from this photo:


The flare of the cuff can be accommodated in one of two ways.  What won't work is just adding fabric along the seam/button opening.  What you will see if you put your hand down flat on a table is that the shape of the hand flares mostly on the side of the thumb, not on the other side where the button opening is.  Adding fabric on that side will only create an awkward shape that won't sit well on the hand.  One option would be to cut the cuff as a separate piece.  This would be in the shape of an arc, which would create a funnel shape - and there may be a less extreme version of this going on in Charles' pourpoint.  But, the human hand is not shaped like a cone.  And since these sleeves are just full of inset gores, I decided to put one at the wrist also.  You can seen in the photo where I slit the muslin open along the center line to check the length when I fitted this on my forearm.  

Fitting the sleeve was a bit difficult on my own and I had to employ some help from a friend.  She helped me tweak the exact shape and location of the armhole seam.  With further time or experimentation, I might have adjusted the shape or size of the sleeve's gussets.  But, we just adjusted the armhole shape to suit the sleeve top.  

Construction details to follow!


Tuesday, March 19, 2019

More Spanish Gothic style

After I shared my previous post about trying to find distinctly Iberian elements in 14th century fashion, a kind Facebook user (Tasha Dandelion Kelly, who has a really great blog as well, which is referended in the first post) shared some photos of an alterpiece from Quejana in northern Spain, which seems to be in Old Castile.  It is currently in the Chicago Art Institute.  The paintings show scenes from the life of the Virgin Mary.  It is dated to 1396.

Photo by Tasha Dandelion Kelly
This piece has a lot of the same problems I encounter in other religious art.  A lot of the saints are depicted in voluminous draperies that are kind of reminiscent of ancient Greco-Roman styles, which I doubt are representative of the artist's contemporaries.  There's the three Oriental Kings arriving for the birth of Jesus, who are also not necessarily a good source for fashion, since their clothes are most likely meant to evoke foreign-ness.  But, there are a few panels with what seem to be representations of contemporary clothing of ordinary people.

Not all of these are helpful for me.  The patron and his wife (kneeling on either side of the crucified Jesus, top center) are fashion-forward and seem to be wearing an early form of the houppelande.  This is great, but not one of the styles I'm looking at repicating.  There are a couple of shepherds in the panel left of center in the lower row.  Their clothing seems to be of the geometrically-cut variety (earlier styles that obviously persist in the clothing of lower classes and those that do manual labor.  The scene to the left of center in the top row shows some soldiers who appear to be wearing jupons - but I don't want to extrapolate too much from images of men who are probably wearing armor.

Photo by Tasha Dandelion Kelly
There are 2 figures in this piece that I found very interesting, from the perspective of my current project. The first, seen here, appears to be Joseph from a scene of Joseph and Mary fleeing to Egypt with the infant Jesus. He is clearly not a soldier, but he is wearing what looks like a jupon - a fitted garment, buttoned all the way down the front - that is very similar to the ones the soldiers in the other panel are wearing.  Joseph's garment also has vertical lines marked on it, possibly indicating quilting.  His sleeves are fairly wide and loose, however, with a turned back hem.  This is unlike either the military-style jupons or other depictions of more fashionable civilian jupons.  Of particular interest on this figure is the fact that his hosen are clearly rolled down to just below the knee (where a garter would be holding them up).  This is commonly seen on men who are doing physical work or are otherwise in a situation where they might be partially undressed or trying to cool off.  But what makes it especially interesting here is that it indicates that, despite having a very short, fashionable garment Joseph is still wearing split hosen and not joined hose.

The other figure that I found particularly interesting is this one here.  Tasha's photos didn't have a good shot of this guy so I apologize for the low resolution - this is zoomed in from the photo on the museum's website.  The structure to the right of him seems to be a stable with horses inside and, since he's holding some kid of stick, I'm assuming he's meant to represent some sort of stable-hand.  But he may also be meant to be accompanying the oriental kings, who are on the other side of him.  This fellow is dressed almost exactly like the hunters on the Alhambra ceiling.  Short, closely fitted garment with buttons all down the front; tight sleeves with an obvious flare where they extend past the wrist (though no buttons are visible, this sleeve shape probably has them); a belt riding low on the hips; and a hood with short hem.  The main differences from the Alhambra hunters are the lack of explicitly drawn buttons on the sleeves and the front seam of the hood, and an apparent slight flare at the hem (where the Alhambra hunters have a narrow hem with side slits).  So, I've now got examples of this style from Old Castile, Andalucia, and Catalunya.  It's also very much in line with fashion north of the Pyrenees at the time.  This is pretty solid documentation for my planned late 14th century style Iberian outfit.   Next up will be some posts on construction, starting with drafting a pattern.