I already have a suitable shirt for this era, so my first step in making this outfit was to work on the "foundation" garment. Since I was looking at a short style, I intend to wear joined hose. Joined hose need to be held up by something. With overgarments as short as what I'm planning, the earlier medieval fashion of just tying individual hose for each leg to a belt or the waistband of the braes isn't suitable. There was a transitional style of "split hose" where the hose were tall enough to cover the buttocks/pelvis, but each leg was still a separate item. But, in the interest of not inadvertently flashing my underwear at people (even if I can throw together some period braes), I'm going with joined hose. So, that means a torso garment to hold up the hose.
There's a great discussion of braes and hosen on this message board. I highly encourage anyone interested in this era to check it out. Robert MacPherson, especially seems to have collected a truly impressive number of pictures of men in their underwear - and I'm grateful! Some of these images are a bit later than my 1390s target.
What the right name for this garment is seems to be a bit of a puzzle. Possibilities include "doublet", "pourpoint", and "jupon".
Some reenactors prefer to call this a doublet. I don't like that primarily because it's a term that is used (correctly) for later, more structured, garments from the 15th century proper through the 17th century. Those garments seem to generally have more internal structure than what I'm going for here. I'm not trying to shape the body, build a silhouette, or even stiffen the garment itself. I personally like the term pourpoint. It comes from French, literally meaning the thing that you tie your points (laces or ties) to. But this term may also refer to the same type of garment as 'jupon'. The term jupon derives from a military garment - something with attachment points for armor. But, many military styles worked their way into the civilian world, inlcuding the jupon - as we saw in my previous post. But this item is something for under a more stylish garment merely to hold up the hose. The jupon seems to be a garment that may be worn on its own. I am definitely not going to settle the debate about what this garment should be called. So, I'm just calling mine The Blue Thing.
In the end, I will probably not actually use the Blue Thing for my Decameron outfit. I started making this before I had totally settled on what I wanted the final outfit to look like (rookie mistake - I should know better by now!). More on that in subsequent posts. But it was a good test garment that allowed me to get a reality check on fit and will be a suitable foundation garment for more properly 15th century styles, if I ever decide to make them.
My main sources for construction details were Crowfoot, Pritchard, and Staniland's Textiles and Clothing, 1150-1450 from the Museum of London series and Sarah Thursfield's The Medieval Tailor's Assistant. I used modern drafting methods to make a basic block for the body. It's meant to simply be a thin, close-fitting layer over the shirt. So, after checking the fit, all I did to turn my basic block into a final pattern was extend it from the natural waist down to the level of my hipbones and add seam allowances. I use 1/2" as my default in most places. The neck was only 1/4". I added a 1" turn back at the center front and the hem.
The sleeve pattern was started from Thursfield's draft, which I love for creating the proper sleeve cap shape for these later medieval garments. Her draft is for a one piece sleeve with the seam running down the back of the arm. There's a lot of evidence for a triangular gore at the top of the sleeve seam in the 14th century. This is found on all the garments from Herjolfsnes, Greenland with surviving sleeves, and can be seen in artwork of the era from mainland Europe. I'm not sure if this construction method would be outdated for my Blue Thing. But I've never tried it before, so I wanted to give it a go.
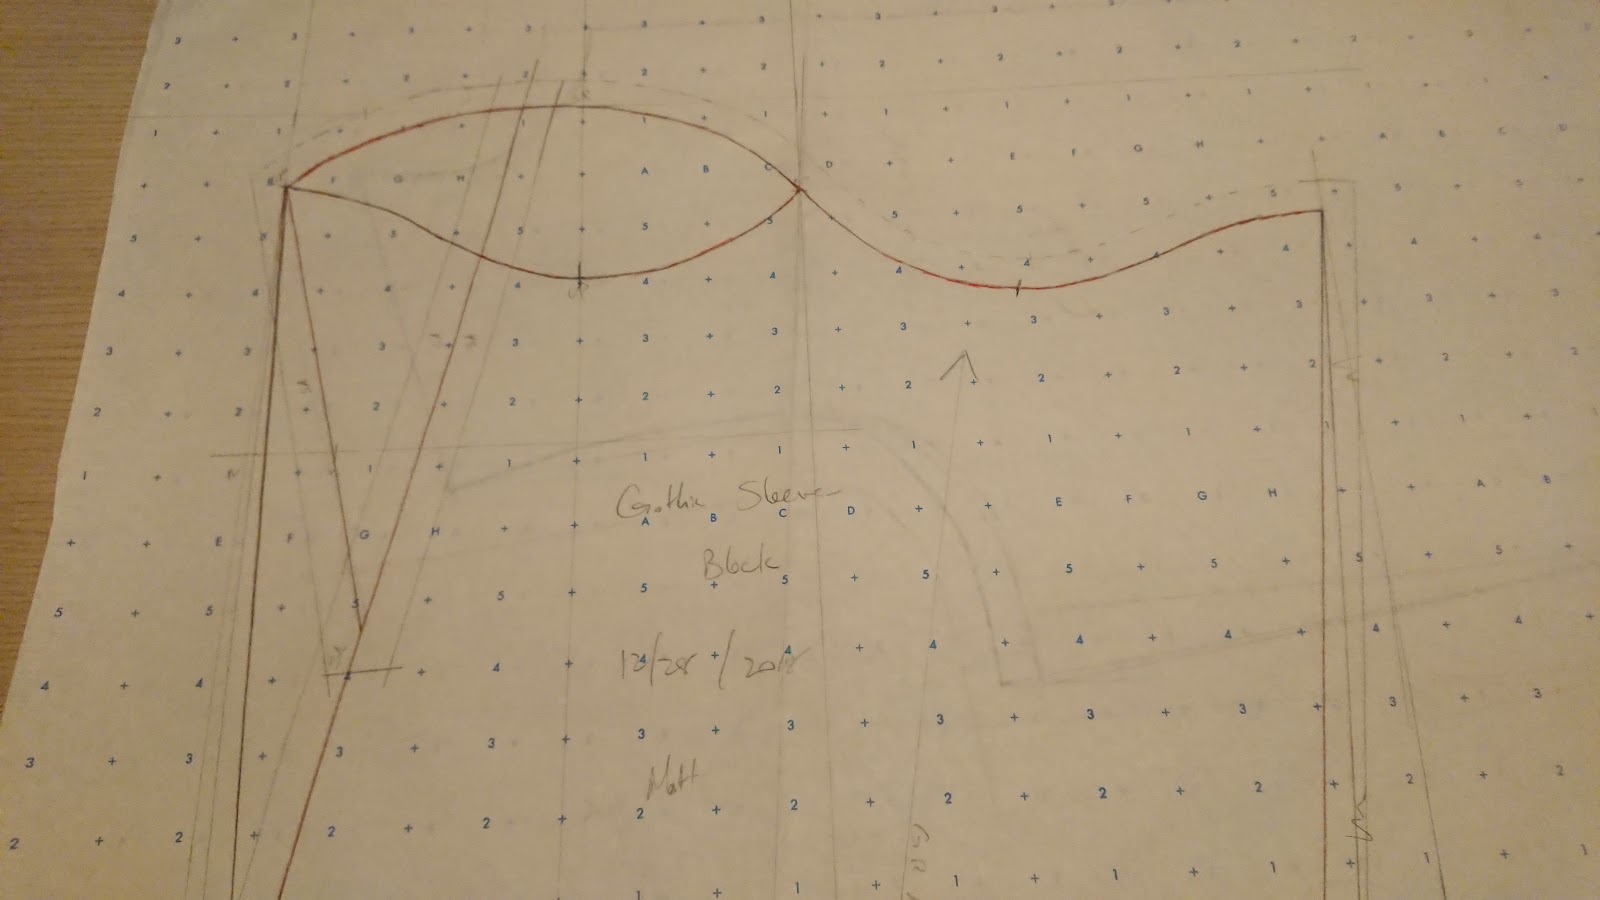
After drafting the sleeve to Thursfield's instructions, I marked out the under-sleeve half of the seam from the armscye to the elbow (on the right in my photo). Making sure I had enough width for my elbow and biceps, I then drew a parallel line to this one to represent the over-sleeve side of the seam. They don't look quite parallel in the photo, but they are. The sleeve then tapers evenly on both sides from elbow to wrist (cut off at the bottom of the photo). The portion of the sleeve cap between the new line and the back edge becomes the base of the triangular gore. I just drew a straight line from the back point of the sleeve cap to meet my new seam about halfway to the elbow. As you can see from the photo, this has the effect of eliminating width in the sleeve for the upper arm. So this is a useful technique to create a really slim-fitting sleeve.

I actually made a mistake here, which I didn't realize until after I had cut my fabric. The two sides of my gore are not equal. This is a problem because it's being set into a seam whose sides are equal before the gore is set into it. In the end, I had to ease the over-sleeve side of the seam into the under-sleeve side for a bit above the elbow. This is not necessarily a bad thing from a sleeve-fitting perspective, but it should not have been necessary if I had made the pattern right. A good reminder to always walk your patterns before adding seam allowance to make sure that the seams match up. What I SHOULD have done was trace off the curve from the left side of the sleeve top (which is the base of the gore), connect the two ends of the curve with a straight line and then draw a perpendicular bisecting line to that to be the center line of the gore. Then, the two sides of the gore would form an isoceles triangle with the curve as the base. I don't think that the fit would change much, but it would definitely have gone together much more easily.
The fabric I used is a worsted wool twill in a light blue. I'm always thrilled to find wool suiting that isn't in a shade of gray, or pinstripe, or some other pattern that just screams modern menswear. I ended up paying more than I wanted to for this, but I did haggle the store down quite a bit and I only needed 2 yards (in fact, I needed even less than that, but I hadn't made the pattern pieces when I bought it and wasn't sure just how efficient I could get with it). The wool is backed by a medium weight linen for body and I stitched a strip of stiff linen canvas to the center front edge for reinforcement to avoid pulling. I used some light weight linen I had lying around for a lining. There's an interesting debate to be had as to whether linen is an appropriate lining material for this type of garment in this era. But, for this project thrift carried the day.

The buttons are made as described in Crowfoot, et al. I stitched a circle in running stitch on a small square of fabric, then pulled that thread up like a drawstring, tucking all the raw edges inside. With a few stitches across the bottom once it's gathered, the whole thing pulls up into a ball shape. I started with a 1.5 inch square, made a 1 inch circle with my running stitches, and the finished buttons are about 3/8" (1cm) across. This is in the range of the ones reported from London by Crowfoot, et al.

I chose to have this garment lace up the front. Since it is essentially something that is meant to have another layer worn over it, this provides a nice, smooth front surface for whatever I put on top. If/when I get around to making a proper 15th century outfit, I'll have to put some eyelet holes around the hem for tying up my hosen. As it turns out, this is really closer to a 15th century type of doublt that what I had planned. And, my ultimate decision on my Decameron outfit went in a different direction. So, for now, I'm putting the Blue Thing aside.
 |
| Apologies for the less than inspiring background - my only full length mirror at the moment is in the bathroom. |

No comments:
Post a Comment