Thursday, November 01, 2018

Stitch variants among Egyptian nalbound socks


So, in speaking with people (both online and IRL) about the nalbound socks from Egypt, there seems to be a lot of interest in the different stitch types that were used. While I did discuss the different types of stitches a bit in my previous post (here) I didn't really explore in detail all the different types of stitches that have been documented in detail.

The text that I used as the basis for that post was part of the explanatory material of a poster-style display I put together. The display included samples of all the different stitch types. I still feel that being able to feel the differences in texture and thickness makes a huge difference in appreciating the variety that can be achieved with different nalbinding techniques. However, a lot of information can be gleaned from pictures. So, I'm putting up some photos of my stitch samples. Hopefully, this will be of interest to someone other than me. :- )

All of the samples in this post were done with a commercial yarn in worsted weight. (Brown Sheep's Nature Spun, for those who are interested) This is much coarser than the yarn in any of the surviving socks from the post-Roman era. But, I felt that it was useful to use a larger yarn in these samples.


Coptic stitch and its variant

The most common stitch found among the Egyptian socks is referred to by most nalbinders as the 'Coptic stitch'. It is also sometimes called the 'Tarim stitch' in reference to a very old hat found in the Tarim basin of western China. The vast majority of the Roman-era and post-Roman socks from Egypt are made in the Coptic stitch. This is the stitch that very closely resembles knitting. Here are photos of my Coptic stitch sample:
Front side of the Coptic stitch. This is held in the orientation in which it was worked. I usually work my stitches crossed in the S-direction because this seems to be the most common in the surviving textiles. 
Reverse side of the Coptic stitch. This looks exactly like the reverse side of knitting. 

There is one sock in a variant of Coptic stitch. I have not seen any published analysis of this stitch, but Dorothy Burnham, in her seminal article on these socks (Burnham, Dorothy. “Coptic Knitting: an ancient technique.” Textile History. vol. 3, No. 1, Dec 1972. pp 116-124.) refers to one sock which "departs from the normal type". Having tracked down her reference to a publication from the Victoria & Albert Museum, it seems that she was referring to THIS child's sock. There is a stripe of 3 or 4 rows in the standard Coptic stitch across the instep. However, the majority of the sock is done in a different, but related stitch. Based on analysis of the museum's photos, I am highly confident that the sock is worked in what Ulrike Claßen-Büttner describes in her book (Nalbinding – What in the World Is That?, Books on Demand, 2012.) as "pierced looping". In the Coptic stitch (which Claßen-Büttner calls "encircled looping") one passes the needle behind the crossed legs of a stitch in the row below the one being worked. In "pierced looping" the needle passes through the loop of a stitch in the previous row. Here is my sample of pierced looping.

Pierced looping outside 
Pierced looping reverse side (looks the same, essentially) 

I am not aware of any other surviving Egyptian socks in pierced looping. It's tempting to speculate that the maker of this sock was attempting to work the Coptic stitch, but was mistaken as to how to make it properly. However, the presence of the band of true Coptic stitch in this sock refutes that idea, since the maker then resumed the pierced looping technique again. You may also have noticed that my sample included several rows of true Coptic stitch. This does not seem to affect the drape or elasticity of the fabric. So, I must assume that it was included purely as a decorative element.


Complex nalbinding stitches

As I mentioned in my previous post, there exists a sizable number of socks from Egypt in more complex nalbinding stitches. For my purposes, I am using the term 'complex stitch' to refer to any nalbinding stitch where stitches are interlinked within the same row as well as linking to the rows above and below. Gudrun Böttcher analyzed a large collection of socks from the Museum der Kulturen in Basel, Switzerland (Böttcher, Gudrun. “Nadelbindung – Koptische Textilien im Museum der Kulturen Basel und im Städtischen Museum Simeonstift, Trier” Archaeological Textiles Newsletter. No. 39, Autumn 2004.) and found 9 different stitch types. There are a small number of socks in complex stitches held elsewhere. I have not found any detailed analysis of the stitch type in these, but visual analysis of the available photos suggests that they are in the same stitch families that Böttcher found.

The most common stitches in Böttcher's analysis were variants of the Mammen or Korgen stitch (UOO/UUOO). There were 3 different connection stitches used with this stitch, which create slightly different looks. The first set use an F1 or F2 join. These are the most basic type of connection stitch. The needle passes through either 1 or 2 loops on the edge of the previous row, from the front.

Front side of Mammen stitch with F1 and with F2 join 
Reverse side of Mammen stitch with F1 and with F2 join
There are also examples of a joining stitch that picks up stitches from the middle of the row below. I have used a more common notation of M1 - meaning that 1 loop was picked up from the middle of the previous row. However, Böttcher uses a more precise abbreviation F(L) 2.1 - to indicate that on the front side, from the left edge of the previous row 1 stitch is picked up from the second rank of loops. (note that my photos have a sample with an M2 join, but this is not attested in the surviving examples) By joining into the middle of the previous row, the bypassed edge forms a ridge on the reverse side of the work. The surviving socks in this stitch seem to have been worked inside-out so that these ridges are on the outside.

Mammen stitch with joins to the middle of row 
Reverse side of the Mammen stitch with middle joins, showing the ridges characteristic of this connection type. 
The next group of samples are variations on the Oslo stitch (UO/UOO). This is closely related to the Mammen stitch and is often the first stitch that beginner nalbinders learn. As with the Mammen stitch, it can be done with either an F1 or F2 join. Also, like the Mammen stitch, the appearance of these two are very similar. The connection between the rows is a bit thicker with the F2 join, but otherwise they look the same. The other variation (lower left in the photos) is UO/UUO - it is a bit more awkward to do, as one loop is bypassed when making the stitch. However, as you can see, the final appearance on the front is very similar to the others (but the reverse is different).
Oslo stitch variants - front side
Oslo stitch variants - reverse side
Three of the socks in the Basel collection use a single-phase stitch - that is, one where the needle passes through all loops in the same direction, rather than weaving in and out. These are related to the stitch used in the famous Coppergate sock found in York. The York or Coppergate stitch is UU/OOO F2. The variants described by Böttcher are UU/OOO F3 and UUU/OOOO F4. The appearance of all is basically the same. However, the difference is more apparent when the work is held in the hand. This stitch basically creates a spiral of yarn for each row. The joining stitches travel through the center of this spiral. So, when an F4 join is used, there are 4 yarns in the middle of the spiral at any given point. This results in very pronounced ridges. The sample with an F3 join has less pronounced ridges, as there are only 3 yarns in the center of each row's spiral. The York stitch (not shown here) is smoother, as there are only 2 yarns in the center of each row's spiral.

Single phase stitches - front side
Single phase stitches - reverse side (same appearance)

The last stitch is highly unusual. In fact, it is almost impossible to describe with Hansen's notation. The basic stitch is simple enough - it is the Danish stitch, one of the most simple types of nalbinding stitches. Böttcher's attempt to describe it is B(L) 2.2 U/OU. By this she means that the connection stitch is made from the back of the work, taking 2 loops in the second rank from the left (or top) edge of the previous row. As always, a picture is worth a thousand words.

This is Böttcher's diagram of the stitch. The left side is showing the front (outside) and the right side shows from the reverse. I made my sample before I had gotten a photo of the sock itself. My sample has a much higher tension than the museum's sock, creating a very dense, almost double-thickness fabric. The actual sock is kind of lacy and looks more like these diagrams.

Front side 
Reverse side
I have my doubts as to whether this sock is actually nalbound. None of the items in the Basel collection have been carbon-dated. A few items have the specific location where they were found listed, but in general the museum's records generally just state "Egypt, nalbinding" with no further information on provenance. It is possible that these socks were acquired as a lot. The appearance of the sock itself is strikingly similar to crochet and the structure, as diagrammed by Böttcher, can be produced in more than one way. For more details on the ways in which different yarn-looping techniques can produce identical structures, I highly recommend the Loopholes blog which explores various yarn-looping techniques. The specific post linked to here contains a diagram of asymmetrical chain loops that looks a lot like the diagram above.

So, those are all the stitch variants I have found attested in surviving nalbound socks from Egypt. It's important to note that the Mammen F2 and Mammen M1 stitches are the only ones for which more than one or two examples are attested. Whether this relates to the actual frequency of use in the period is an open question, since it's almost impossible for us to know how representative a sample the surviving socks are. Additionally, the number of socks in the Coptic stitch is far greater than the number in complex stitches. Again, it is impossible to know how accurately this reflects the relative frequency of production in the period. But, it is quite likely that socks in the Coptic stitch were significantly more common than those in complex stitches.

Lastly, for more details on how to make these stitches, including videos, I highly recommend the marvelous Neulakintaat website. Happy stitching!


Friday, September 21, 2018

My reproduction socks


     So, now that I've described the surviving socks from post-Roman Egypt, I can show off my reproduction attempts.  Since I do not spin, I was working with commercial yarn.  The gauge of the extant socks in Coptic stitch is generally between 8 and 12 stitches per inch.  Estimating stitch gauge of the complex stitches is a bit more difficult, but as best I can determine, the yarn thickness is comparable in the complex stitch socks, if not slightly thicker.  I was able to obtain a gauge of 8.5 stitches per inch in the Coptic stitch with fingering weight/sock yarn. 

     My first attempt at making these socks was a bit of an experiment.  For teaching purposes, I made one sock in nalbinding and then reverse-engineered a pattern in order to knit the other one.  This was educational for me, but also helps me when I'm teaching about nalbinding.  It allows me to show students both how similar twisted-stitch knitting is to Coptic nalbinding and how one can distinguish between the two.  I chose red, since it's well documented among the surviving socks.  The adult size socks in Coptic stitch are generally all one color.


     You can see the cords tied around my ankles in the photo.  This seems to be the way these type of socks would have been worn.  Since I had very little information to go on as far as making the cords, I did a simple finger-loop braid of 3 loops.

     For my second pair of socks, I was trying to perfect the fit around the heel and ankle.  You can see in the photo above that the red socks are a bit loose around the heel and ankle.  I determined that I started the heel flap too soon, which results in the ankle being too big.  I also made the heel flap a bit too wide, which causes the corners in the back to poke out, rather than lay flat against the foot.  I did correct these defects in the second pair of socks.  This photo shows what I think should be the correct fit around the heel.


     I chose to make my second pair out of a very non-descript brown color of wool.  These have an undivided toe.  I decided to do this, since I was focusing on the fit of the heel and ankle.  However, it turned out not to be any less time consuming than constructing a split-toe sock.  Something that did strike me when taking photos of the socks, though, was that they curl up in a very similar manner to the socks in the museums (when the curators have not mounted them on foot-like or not-so-foot-like stand).  This is due to the nature of the Coptic stitch.


     For the second pair, I was able to look for more detail in the surviving socks about how the cord ties might have been made.  In one particular sock from the British Museum, there are surviving remnants of a cord around the ankle.  It is a simple twisted cord, appearing to be the same width as the welt across the top of the instep (which takes on a twisted-cord appearance due to the way in which the sections are joined).  So, I took a length of the same yarn I used to make the sock and doubled it, overtwisting in the same direction as the yarn's twist.  I then pulled it through a couple stitches at the corners of the front slit before letting it double back on itself to ply into a twisted cord.  This method was incredibly simple and worked well.


     My third pair was an attempt to replicate some of the complex stitch socks.  I chose to use the UOO/UUOO with an F2 connection, since this seems to be the most common complex stitch among the Egyptian socks.  Since there are examples of both split toes and undivided toes among the complex stitch socks, I chose to make a pair with split toes.


     The adult socks in complex stitches display more types of stripes than the Coptic stitch ones.  So, I decided to go a little nuts and make this pair flashy.  One thing I would do differently in a future pair is that the heel flap on this pair came out too short.  Since the coplex stitch socks use a triangular heel flap, rather than a rectangular one, I was decreasing on either end of the short rows of the heel flap.  The rate of decrease ended up making a flap shorter than I really needed to fit my foot.  I thought that the stretch of the fabric would even that out, and it kind of did.  However, I noticed that some of the extant socks have a couple rows worked back and forth along the edges of the heel flap before the work continues around to form the top of the heel and the ankle/leg section.  Like this sock from the British Museum:


Was this a way of adjusting for a too-small heel flap?  It's hard to know for sure, but it can certainly work that way.  And had I noticed this earlier, I might have tried it.  This will be something I can try for a future pair if I run into this same fitting problem again.

     So, these are my Egyptian style socks so far.  More to come, hopefully.


Thursday, September 13, 2018

Socks from Post-Roman Egypt (background)


[This is a recompilation of the information I had put together to present the work I've been doing with re-creating Egyptian nalbound socks. I presented this for our Provincial A&S champions competition, the Keeper of the Central Flame competition this spring, and at the Pennsic A&S display this year. I'm putting this up here because I've had several people who were interesting in learning more about my socks.]


Cultural Background
     Due to the climate in Egypt, the conditions there are very favorable for the preservation of textiles in archaeological contexts. There is therefore a huge number of textiles and textile fragments from various eras of Egyptian history, extant in museums around the world. Many museums hold socks from Egypt dating to the post-Roman (sometimes called Coptic) period, roughly the 3rd to the 7th centuries CE.

     Egypt became a part of the Roman empire in approximately 30 BCE. (Wikipedia) However, aside from some high-ranking imperial officials, the majority of the “Romanized” population in Egypt remained Greek-speaking and could more properly be described as “Hellenized”. When we speak of “post-Roman” Egypt, we are really speaking of the period following the division of the Roman empire into its Eastern and Western halves. Egypt remained under the rule of the Eastern Roman (Byzantine) empire until it was conquered by the expanding Arab Muslim empire in the 7th century CE.

     Culture within Egypt during this time, including fashions in dress, was a mixture of Hellenic, Roman, and native Egyptian practices. The period is characterized by the dominance of Christianity and the development of the Coptic church (a uniquely Egyptian sect which survives to this day). Most of the surviving socks come from Greek-speaking Christian sites within Egypt and should be understood in that context. While most of the surviving socks have been dated to the post-Roman era (3rd-7th centuries), more recent radio-carbon dating has confirmed that some may be from as early as the 1st century, CE. Even these earlier centuries in Egypt still represent a mixture of Hellenized Roman and native Egyptian culture, but without the dominant influence of Christianity.


Surviving socks
     In order to understand the socks from Egypt, it is necessary to discuss briefly the types of shoes worn in this period. Figure 1 (Burandt) shows the types of shoes common in the Roman empire. In addition to these characteristically Roman styles, a more typically Byzantine style is also found in Egypt during this period, usually described as a slipper – see photo below. The Metropolitan Museum of Art indicates that “Written evidence suggests that sandals [soleae] were worn by government officials, slippers by monks and clergy, and boots by soldiers and laborers; the poorest members of society would have gone barefoot.” (Metropolitan Museum of Art, display placard). Many varieties of socks can be worn with the carbatinae, caligae, and slippers. However, due to the presence of a leather thong between the first and second toes (similar to modern flip-flops), soleae, if worn with socks, require a specially made sock with separate compartments for the first toe and the minor toes.


Figure 1 - from Burandt, Boris. "Iron-footed hobnail patterns under Roman shoes and their functional meaning." Small Finds and Ancient Social Practices in the Norhtwest Provinces of the Roman Empire. ed. Stephanie Hoss & Alissa Whitmore (Oxbow Books) 2016. 

Slipper type shoes at the Metropolitan Museum in New York (photo by me) 

There are two main types of surviving socks from the Roman empire, including from Roman Egypt, and from post-Roman Egypt: socks made from woven cloth and socks made with the nalbinding technique. (Kostner) My focus here is on the socks made with nalbinding. These can be further divided into those employing the Coptic stitch (also referred to as “Coptic knitting”, crossed looping, and Tarim stitch) and those employing more complex nalbinding structures.


Nalbinding
     Nalbinding (also called needle-looping or knotless netting) is made using finite lengths of yarn on a needle with an eye using a technique similar to sewing or embroidery. The yarn is formed into a series of loops which form a flexible and stretchy fabric. The structure of the Coptic stitch is very basic. Each stitch is a simple loop that crosses behind (or in front of) itself. In forming each stitch, the needle passes behind a stitch in the previous row, specifically passing behind the part of the stitch where the yarn crosses itself. (Figure 2) This stitch is employed in the majority of surviving socks from Egypt.

Figure 2 - The structure of Coptic stitch nalbinding. 

     There is one child’s sock (Photo 1) which employs a variant in which the connection to the previous row passes through the loop, rather than behind the crossing of the previous row’s stitch. (analysis mine) The Coptic stitch is also found outside of Egypt.
 
Photo 1 - from the Victoria & Albert Museum (item 1287-1904)   http://collections.vam.ac.uk/item/O128879/sock-unknown/ 

     I am using the phrase “complex stitch” in this context to refer to any stitch structure other than the Coptic stitch (or it's variant of 'pierced looping'). In complex nalbinding stitches, each stitch connects through one or more stitches in the same row. In the Coptic stitch, as can be seen in Figure 2, each stitch only connects with stitches in the row above and the row below. There are many possible variants of the complex nalbinding stitches, and these are common in other European contexts, such as the many examples from Scandinavia. At least 9 different stitch structures have been documented in socks from post-Roman Egypt. (Bottcher) I will use Hansen’s notation for nalbinding structures to refer to specific stitches.

     In either case, the nature of nalbinding and the way the stitches and rows form makes it especially suited to creating tubular and bag-like structures. So, it is especially suited for making socks. The elastic nature of the resulting fabric helps create a close fit as well, which is also advantageous in a sock.

Socks in Coptic stitch
     The vast majority of socks in the Coptic stitch have a division between the first toe and the lesser toes. This indicates use with soleae or a similar type of sandal. While there do exist socks of this type with an undivided toe section they are by far in the minority. Even socks made to fit infants or toddlers exhibit the characteristic divided toe.

     The overall structure of socks in the Coptic stitch is remarkably consistent. In addition to having a divided toe, the heel is shaped in essentially the same manner in all the surviving socks of this type. This structure was described by Dorothy Burnham in a study of the socks from two museum collections. (Burnham) Analysis of socks from other collections has so far not revealed any exceptions to the construction method she describes. The two toe sections are worked separately, beginning with a small ring of stitches and working up from the tips. The lateral section is shaped by a series of increase stitches on the lateral edge. The two sections are then joined and the foot section is worked up to the instep. A heel flap is worked back and forth to create the heel part of the sole and the work is interrupted at the back of the heel. A square heel is formed (occasionally with the last few rows getting narrower) as the work continues back and forth to create the sides and back of the heel part. When the sides of the heel have reached the proper height, work resumes in the round, usually creating a welt across the top of the instep (continuous with a welt formed on either side of the heel). This welt, while serving as the functional connection between the foot section and the heel/ankle section, is also decorative and resembles a twisted cord. All of the known socks worked in the Coptic stitch are ankle-length.

Photo 2 - from the Victoria & Albert Museum (Item 2085&A-1900)   http://collections.vam.ac.uk/item/O107787/pair-of-socks-unknown/ 

     The primary type of variation seen among these socks is in the way the top is finished. (Photo 2-4) There are some socks which are simply worked up to the top edge in the same manner, forming a plain top. Some have ribbing, created by working some columns of stitches into the previous rows from the back to the front, rather than front to back (analagous to purling in knitted material). The most common finish at the top is a single vertical slit at the front of the ankle (created by working back and forth again, once the lower portion of the ankle is formed. These socks generally have remains suggesting the presence of cords attached to the corners and some have surviving cordage. At least one sock has two slits, creating a tongue in the center of the front ankle with lacing either on both sides or running over it. 
 
Photo 3 - from the Victoria & Albert Museum (Item 1243-1904) http://collections.vam.ac.uk/item/O128875/sock-unknown/ 
Photo 4 - from the Victoria & Albert Museum (Item 1936-1897) http://collections.vam.ac.uk/item/O128867/sock-unknown/ 

     The adult size socks in Coptic stitch are almost universally monochrome. The children’s socks are often formed of multicolored stripes. (Photos 1, 5) The surviving socks are dyed in bright and dark colors, and examples of every color in the spectrum can be found. There are also examples in white and off-white colors as well. The socks in Coptic stitch that I have found are all made of wool. There are examples of S- and Z-spun yarns, and 2-ply, 3-ply, and 4-ply yarns have been described. The gauge is generally in the range of 8-12 stitches per inch (roughly 3-5 stitches per cm).


Photo 5 - from the Manchester Museum https://egyptmanchester.wordpress.com/2012/03/22/curators-diary-22312-of-sling-shots-and-coptic-socks/ 

Socks in complex stitches
     The socks worked in complex stitches are less common than those worked in Coptic stitch. There are many stitch types employed in the surviving examples. The Museum der Kulturen in Basel, Switzerland has an especially large collection of Egyptian socks in complex nalbinding stitches. There are 9 different stitch types represented in this collection. (Bottcher) There are 3 items using single-phase stitches (UU/OOO and UUU/OOOO) and over 20 items using 2-phase stitches (with the most common by far being UOO/UUOO with two different types of connecting stitches). In addition, Bottcher includes one item with a very unusual stitch type, not easily described in Hansen’s notation. I have not found any published analysis of the stitch types in socks from Egypt in other collections. However, my conclusion, based on photographs of the socks (Photos 6 and 7) is that these are probably of the UOO/UUOO or UO/UOO stitch type (both of which are attested in Bottcher’s sample).

Photo 6 - from the British Museum (item EA72502) http://www.britishmuseum.org/research/collection_online/collection_object_details/collection_image_gallery.aspx?partid=1&assetid=1031262001&objectid=118868 

     Socks in complex stitch types are more likely to have an undivided toe than those in Coptic stitch. Those with split toes and those with undivided toes are both common among the examples I have found (with undivided toes being slightly more common in this group). There are several reasons why this may be. Firstly, the complex stitches create a slightly thicker fabric (assuming the same thickness of the yarn) than the Coptic stitch does. Having additional thickness in between the toes would be less comfortable when wearing soleae type sandals. Second, because the complex stitches can produce a thicker fabric, they may have been used when a warmer foot covering was desired. This desire for warmth may or may not correlate with the use of closed shoes, thus explaining the presence of complex stitch socks with split toes. There does not seem to be any correlation between the size of the socks (adult vs. child) and the use of split vs. undivided toes.


Photo7 - from the Museo Archeologico Nazionale Florence via Global Egyptian Museum (Inventory # 12920) http://www.globalegyptianmuseum.org/record.aspx?id=9130 

     The heel construction of complex stitch socks is different from that used for the Coptic stitch socks, but is also remarkably consistent throughout the samples. Whether or not the toe is split, the foot portion of the sock consists of a tube worked up to the instep. The heels of these socks are composed of a series of short rows forming a triangular or trapezoidal shape extending back from the sole of the foot portion. The steepness of the triangle sides varies somewhat, but the general shape is nearly universal. The stitching then resumes from the front/instep along the ends of the short rows and continues up into the ankle/leg portion. (Photos 6-9)
Photo 8 - from the Museum der Kulturen Basel (Item III 15479)
     The complex stitch socks vary in length as well. This is consistent with the variation in the types of closed-toe shoes worn in the Roman empire and Byzantine empire. Some of the socks are ankle length, like the Coptic stitch ones. But other socks appear to be mid-calf or calf length. None of the complex stitch socks have structural variation at the cuff. However, some have decorative color patterns at the cuff. (see Photo 9)

Photo 9 - from the Museum der Kulturen Basel (Item III 15397) 
     These socks also display a wide range of colors. Most of them are made of wool. I have found very little information on the details of the yarn in these socks (thickness, spin direction, plies, etc.). However, some of the complex stitch socks are made of linen or cotton. The vegetable fiber socks are all primarily white or off-white; one has a small number of stripes in a blue color (probably from indigo) that are only one or two rows wide.


Conclusions and wider implications
     There have not been any finds of socks in the nalbinding technique from elsewhere in the Roman or Byzantine empires. It is clear from the large number of surviving Egyptian socks that they must have been a fairly common item there in the post-Roman era. The use of radio-carbon dating to establish that some of these socks date to the era of Roman rule in Egypt, plus their discovery mostly in Greek-speaking enclaves, suggest that they may have been a Roman (or Hellenized) fashion, rather than one developed in the Egyptian tradition. So, is there any evidence that nalbound socks were used elsewhere in the Roman empire?

     There is textual evidence of the use of socks throughout the Roman empire. (Kostner) There are surviving socks sewn from woven cloth from the areas of modern-day France and Britain. (Kostner) However, none of the socks found outside of Egypt have a split toe, meaning they could not have been worn with soleae. Kostner includes in her article a photo of a funerary stele from southern Germany clearly depicting a woman wearing soleae with socks. It is likely that people in the northern and northwestern provinces were wearing soleae (this seems to have evidence from other sources as well – as noted in the explanatory placard from the Metropolitan Museum quoted at the beginning of this post, there was a certain social implication to a person's choice of footwear).  So, it seems likely that they would have seen the need for socks in the colder climates of Rome's northern provinces. There is evidence of comtemporary use of nalbinding in northern Europe (Classen-Buttner) So, it is certainly possible that this technique, known in Roman Egypt and used elsewhere in northern Europe, could have been widely used in the Roman empire. However, this will have to remain speculation unless or until someone finds more definitive pictorial evidence or an extant example.


References

Bozsa, Isabella. Museum der Kulturen Basel, private correspondence, 2018.

Böttcher, Gudrun. “Nadelbindung – Koptische Textilien im Museum der Kulturen Basel und im Städtischen Museum Simeonstift, Trier” Archaeological Textiles Newsletter. No. 39, Autumn 2004.

Burandt, Boris. “Iron footed – hobnail patterns under Roman shoes and their functional meaning.” Small Finds & Ancient Social Practices in the Northwest Provinces of the Roman Empire. Ed. Stephanie Hoss & Alissa Whitmore, (Oxbow Books) 2016.

Burnham, Dorothy. “Coptic Knitting: an ancient technique.” Textile History. vol. 3, No. 1, Dec 1972. pp 116-124.

Claßen-Büttner, Ulrike. Nalbinding – What in the World Is That?, Books on Demand, 2012.

Collin, Maria. “Sydda Vantar.” Fataburen, Nordiska Museet Fataburen, 1917. pp 71-82

Hansen, Egon H. “Nalebinding: definition and description”. Textiles in Northern Archaeology, NESAT III: Textile Symposium In York, 1990.

Kendrick, AF. Catalogue of textiles from burying-grounds in Egypt, Victoria & Albert Museum, London: H. M. Stationery Office, 1920-21.

Köstner, Barbara. “Wearing socks in sandals: The height of Roman fashion?” Small Finds & Ancient Social Practices in the Northwest Provinces of the Roman Empire. Ed. Stephanie Hoss & Alissa Whitmore, (Oxbow Books) 2016.

Leroux, Ernest, ec. Le costume en Egypte du IIIe au XIIIe siècle. Paris:Palais du Costume, 1900.

Schinnerer, Luise. Antike Handarbeiten, Vienna, 1895.

Wikipedia contributors. "Egypt (Roman province)." Wikipedia, The Free Encyclopedia. Wikipedia, The Free Encyclopedia, 29 Mar. 2018. Web. 13 Apr. 2018.
https://en.wikipedia.org/wiki/Egypt_(Roman_province)


Museum Catalogs
The British Museum - http://www.britishmuseum.org/research/collection_online/search.aspx
Global Egyptian Museum (collates collections from numerous museums worldwide) - http://globalegyptianmuseum.org/
The Manchester Museum - https://egyptmanchester.wordpress.com/2012/03/22/curators-diary-22312-of-sling-shots-and-coptic-socks/
The Metropolitan Museum of Art - https://metmuseum.org/
Victoria & Albert Museum - https://www.vam.ac.uk/archives/


Sunday, July 22, 2018

A Cap of Maintenance

So now that this has been given, I can write about it.

My very good friend, Baroness Johanne ap Wisby was elevated to to the Order of the Pelican on 6 January 24 March 30 June.  In case someone who's not involved with the SCA happens to be reading this: the Order of the Pelican is the SCA's highest honor for service to the Society and is considered one of our peerage orders.  As such, during the elevation of new member one of the things they are given is a 'cap of maintenance'.  You can read more about caps of maintenance here.

The cap of maintenance is a red cap with ermine fur trim.  While the cap of maintenance is usually in the form of a bycokcet (the "Robin Hood" cap), this is not really in line with Johanne's persona.  Plus, she doesn't often wear hats.  Johanne usually wears 12th-13th century Scandinavian garb.  So, in an effort to give her something that she might actually wear in the future, it occurred to me that she might like something in the form of the St. Birgitta cap.

The cap, or coif, of St. Birgitta is a relic.  Birgitta was a 14th century Swedish saint.  This head covering can be called a coif, 'huva', or 'huvete'.  There are many descriptions of this type of cap online.  This page has some good information on the relic itself, which has an embroidered band along the front edge and insertion embroidery for the seam.  This one has some good images from period artwork showing this type of cap in wear.  These sort of hair coverings are almost universally made of white linen.  However, in order to make it into a cap of maintenance I would make one out of red linen.

I mostly used the pattern on this page which is pretty good.  The main difference in my construction was that I made small gathering stitches along the bottom rather than pleating, since I didn't feel I could easily pleat 10 inches down into 2 (although, I suppose that you could consider what I did to be cartridge pleating).  There a wonderfully detailed description of the complex insertion seam embroidery on this page but I chose to use a more simple version detailed here.  The seam is worked in red silk embroidery thread.


The edges were hemmed and then basted to a piece of graph paper.  This helped me keep the spacing even.  This first photo shows the herringbone stitch which is the base of the insertion seam.  The second photo shows the first pass of the interlacing stitch.


And finally, the other side is interlaced.


Originally, I had asked a friend who does silk painting - Lady Angelica de Nova Lipa - about creating a strip of silk printed with heraldic ermine spots.  She found the small scale and detail a bit difficult, though.  In the end, she embroidered ermine spots onto the silk for me.  I used this both for the embroidered band on the cap itself, as well as the straps (which are really one continuous band with the edge treatment). Here is the attached ermine band and the finished cap, posed on an upside-down pitcher.


This was a fun little project.  I particularly enjoy adapting historical styles and techniques in novel ways, either for some interesting "modern" use or for our unique SCA customs.  I don't think there's any evidence for this type of cap in anything other than white linen in the Middle Ages.  Likewise, a traditional cap of maintenance is always in the form of a bycocket.  However, this project really highlights the "creative" part of the Society for Creative Anachronism - which makes me smile.

For bonus, some pelican embroidery with Johanne's arms that was put on a cloak that was used as a "vestment" for her elevation:


Monday, February 12, 2018

A Medallion using Wire Embroidery


So, this year's super-secret project #1 has finally been given and I can now post about it!  (super-secret project #2 will get its own blog post once it has been given out)

My friend Þórfinnr was inducted into the Order of the Maunche this past Saturday.  For those not in the SCA, or the East Kingdom, the Order of the Maunche is one of our Orders of High Merit - it's an award for skill in the arts and sciences of the Middle Ages.  It usually recognizes not just skill, but also research into the way things were done/made in our period of interest.  Þórfinnr is an awesome guy whose research and crafting spans many topics (check out his blog on medieval Chinese brewing, where he is actually translating recipes from a period text, and this blog with other varied topics).  But, for the purposes of this discussion we're going to talk about Viking era wire ornament on clothing.

So, Þórfinnr has done a bit of nalbinding, and he knows that I've done quite a bit.  And we ended up geeking out over some wire embroidery from the finds at Birka in Sweden at one point.  In fact, he gave me a copy of the book referenced below.

Since he's very interested in all aspects of Viking-era Scandinavia and creating an authentic Viking persona, Þórfinnr was looking at a type of embellishment called posaments.  These are generally wire decorations done on the surface of clothing and there are many variations.  There is a particular version found at the Birka site in Sweden which is done in the same manner as the Coptic nalbinding that I've previously discussed on this blog (here and here).  Agnes Geijer, in her book Birka III - Die Textilfunde, describes them in the chapter on embroidery, rather than as posements, but is very clear that the work is done with fine silver wire.

This type of embellishment is worked with crossed loops of the wire, either in columns or rows.  The wire usually passes behind the base fabric at the ends of the rows, or on either side of a column:

This is the illustration from Geijer's book.  The work I did is mostly similar to type C seen here. 

All of this is basically preamble to the main thrust of this post.  Upon induction into the Order, each person is given a medallion with the order's symbol (seen at the top of this post).  It's a stylized, heraldic version of a particular type of sleeve that generally ends up looking like the letter 'M' (or a diagram of a colon - but maybe that's just me).  Since I think Þórfinnr is a cool guy and he introduced me to this interesting variation on a technique that I've been using, I decided that I'd like to use this type of wire embellishment to make a medallion for him.

So, I got myself some brass wire (with gold-finish and with an anodized purple finish) in 24 gauge, which was the thinnest wire in the store I went to.  Everyone I spoke with about working with looped wire had told me that one had to use pliers to manipulate the wire.  This did not work out so well.  Since the fabric base I was using was silk, the pliers and the cut end of the wire kept snagging the threads, which you can see in this photo.  Also, even though I tried to file the cut end of the wire, it was still difficult to push through the fabric.

Here are some early attempts (real failures on the right)
 So, I decided that maybe I needed even thinner wire.  After all, Geijer had described this as embroidery, and the technique is the same as nalbinding, which I was used to doing with a needle.  So, I got some 30 gauge wire.  This was thin enough that I could thread it onto an embroidery needle.  This worked out much better.  The portion on the left of the photo above was my first successful attempt with the thinner wire.

The thinner wire behaved much more like thread or yarn and did not require pliers to form it into loops.  Plus, the embroidery needle went through the fabric much more easily.  It was much more like working nalbinding - which I'm familiar with.  Once I got the hang of not catching the needle's point on the fabric when I didn't want to, it went pretty smoothly.   Ultimately, I think that the 30 gauge wire is probably very close to the gauge used in the originals.  My finished work has about 7 stitches/cm - which is exactly the gauge, as best as I can determine from Geijer's information, of the pieces from Birka.

The base fabric is silk taffeta.  I think it is probably less substantial than the silks that Viking-era people would have used for this purpose.  So, when I stitched together one piece of gold and one piece of purple silk, I doubled them back so I was working with a double thickness.  The shape of the Maunche was outlined with basting thread and then the work began!

Here is the left half done with purple wire on the gold silk.  Ruler for scale.

And here is the completed design.
The surviving examples of this technique from Birka were most likely apliqueed onto a garment of some sort.  But, not knowing whether Þórfinnr would want to do that, I figured I should finish it up as a medallion (as is typical SCA practice).  So, I cut out a circle around the embroidery and chose a bit of wool that I knew would not fray as a backing and then used some silk embroidery thread to make a blanket stitch around the edges (holding down a narrow folded hem in the silk).

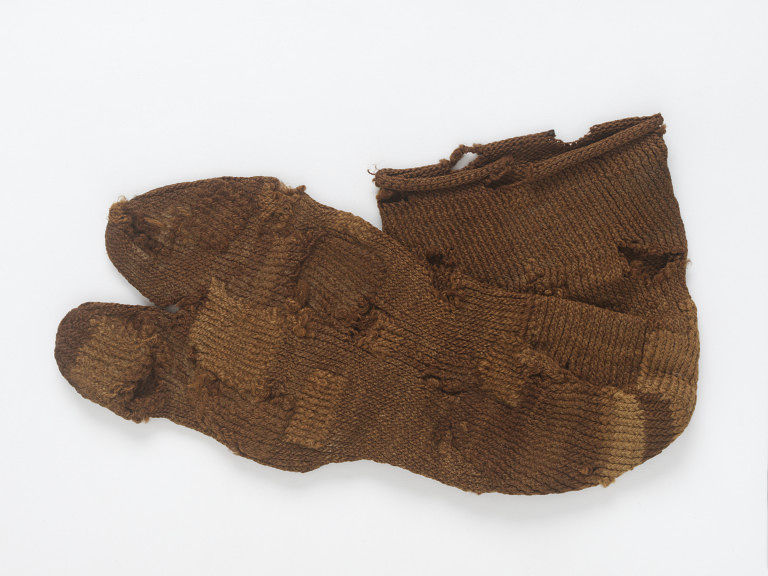
I finished the edges of the piece with more wire work. There is a surviving cuff from Birka described here which had this.  It's the same Coptic stitch-style looping, worked into a tube (like "trichinopoly"/wire weaving chains) with the wire piercing through the fabric at the end of each row.  As I started working it, I realized that my backing wool was still a bit floppy.  So, I used a piece of medium weight leather in addition to back the piece.  The edge coil goes through all layers.

Wire coil in purple on the left.  On the right, you can see the blanket stitch in silk.  I probably should have done the silk blanket stitch in the same color as the cloth, rather than the color of the wire that would go over it.  I think it makes the coil pattern less distinct.  

The completed edge finish

Last, I used some coiled wire to add a loop for a cord to the top.  This is not structurally connected to the edge finish, so if Þórfinnr decides that he does want to apply this onto a sash, bag, or garment he can just take it off.

The finished medallion, with ruler in inches for scale

I think this was a very successful attempt at adapting a craft practice from period examples for something that is particular to the SCA.  A real piece of creative anachronism!